Here are the four completed pedals. Sorry for the shit sound, playing, quality and voiceover.
Its just for fun. Also, Im a mess as all my clothes are packed for vacation and I havent shaved for 3 days :D
All videos were filmed with the low quality setting on my Panasonic digital handheld 14mp camera, using nothing fancy at all. Guitar is a 1991 Fender Telecaster Plus with Lace Sensor pickups, and the amp is a Blackstar Artisan handwired 15 (not that you'd know given the audio quality, but what the heck!)
Enjoy!
SuperHardOn
Wully Mammuth
Fuzz Factory
Wolf Comp
Friday, 25 February 2011
Fun with decals part trois
Last on my list of pedals Ive completed and am happy with, the Wully Mammuth.
I think this one looks pretty cool, obviously a lot of green expanse, as I boxed this in a case double the size of the original. Anyway, here is the result:


Here is a nice collection pic of my completed builds so far.
Couple of detail points, the Wolf doesnt sound like a Wolf, pretty sure we have come to the conclusion that the schematic isnt as it should be, so its not particularly a mistake, just thats how the schematic makes the pedal sound.
Also, for some reason the screws that shipped with the box for my Mammoth dont fit, so it anyone has some M3.5 screws, of a lengh about 5mm, or has the standard 12mm and a means of shortening them, I would love to hear from you. Ive checked hardware stores and online. It sucks not being able to screw the back on properly.
Anyone, some piss poor videos shortly, then Im off on vacation.

Thanks
Thursday, 24 February 2011
Fun with decals part deux
I have completed the Fuzz Factory :)
Very happy with the end results, though its still a learning curve.
A little misalignment adds to the "hand crafted" appeal, right?!


Just a note/disclaimer - these are 1 offs, for my own personal use, not for sale. Therefore, using the Vex artwork should not be a big deal, and if it is, they are just stickers.
"Fun" with decals
I recently ordered some vinyl inkjet sticker decal paper stuff from ebay...a little over £1 a sheet.
After epic failing the first two sheets (one in greyscale, one the wrong actual scale) I managed to get a sheet printed with a FF, WM, SHO and my latest build in progress, Wolf Computer. I modified the Zvex artwork for the SHO, and made my own WC design inspired by the mellowtone original. I think it looks cool !
I've sanded and cleaned the top of the case for the SHO and to-be-built WC.
Then I rubbed with acetone to clean, applied the decal. Let it stick for a while. Sprayed on two coats of clear laquer and the results are thus:


Obviously its easier to do before you have filled the box with gubbins, so I'm intending to make decals for all my boxes moving forward *before* I box them up. Spilling the guts of my FF is going to be a task and a half.
Sadly there is a few bubbles on the WC, but its a one pass deal, mess it up and you cant unstick and restick.
For those interested, I used these chaps, with a variety of products.
Came fast, well packed in two sheets of card in a proper cardboard backed envelope:
http://www.qpmedia.co.uk/ and they have an eBay store which I prefered to use QP ebay store
Will post up again when the Wolf is roaring...board is built, just needs wiring and boxing.
Update:
FF in progress!

Tuesday, 22 February 2011
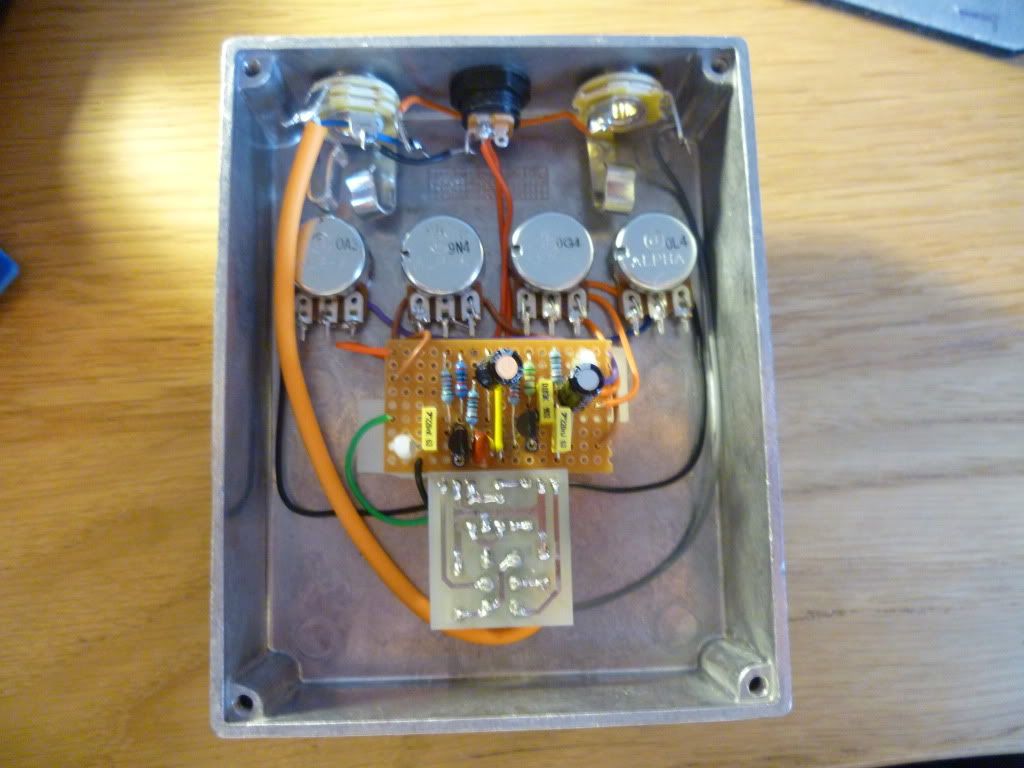
Build Diary 3: Wully Mammuth
This is gonna be my third blog about actually handcrafting a pedal from scratch. I tried to remember to take photos at the important steps, to help document the process. Hopefully some of the ideass/methods that I introduced in the Fuxz Faxtory build will be elaborated upon here, particularly the way I wire in the potentiometers. Id love to hear some comments on that method, good or bad.
Also I reckon this is definitely a step up in the quality of work for me. Its my best build to date, and seeing as its the most recent, that does make common sense. However, my learning process has lead me to one massively important conclusion: It is incredibly important to plan plan plan check and plan again your proposed layout. I dont mean the circuit board, I mean the whole thing: location of the ins and out, location of the power supply, whether or not you want a battery, if so where will it go in the case? Where will the footswitch go? How close to the edge of the case? Do you want the body of the footswitch to act as a "cradle" for a 9v battery to stop it floating around in the case? Where will your circuit board go? How will you make sure it doesnt ground to any parts of the case? etc etc etc
As evident, this isnt an exhaustive list, but from my first build to this, that is the major concern that I have had to address. Otherwise, you soon realise, shit, my board wont fit anywhere, or its gonna touch something, or I dont have any room left for a battery. Anyway, you get the picture.
So, lets begin the build process. Firstly, selecting a circuit. Since I am still at the point of using Vero board, I didnt even considering buying a PCB, but there are commercialy available WM inspired designs, so if you fancy that route you can. Likewise, the Schem is on the net, so feel free to make your own Vero, Perf or other layout. Speaking of which, there are also a number of Vero layouts around. Furry Elephant, Prehistoric Fuzz bla bla. Anyway, I chose to use the freshly verified and beautifully compact layout here: IvIark's WM vero layout

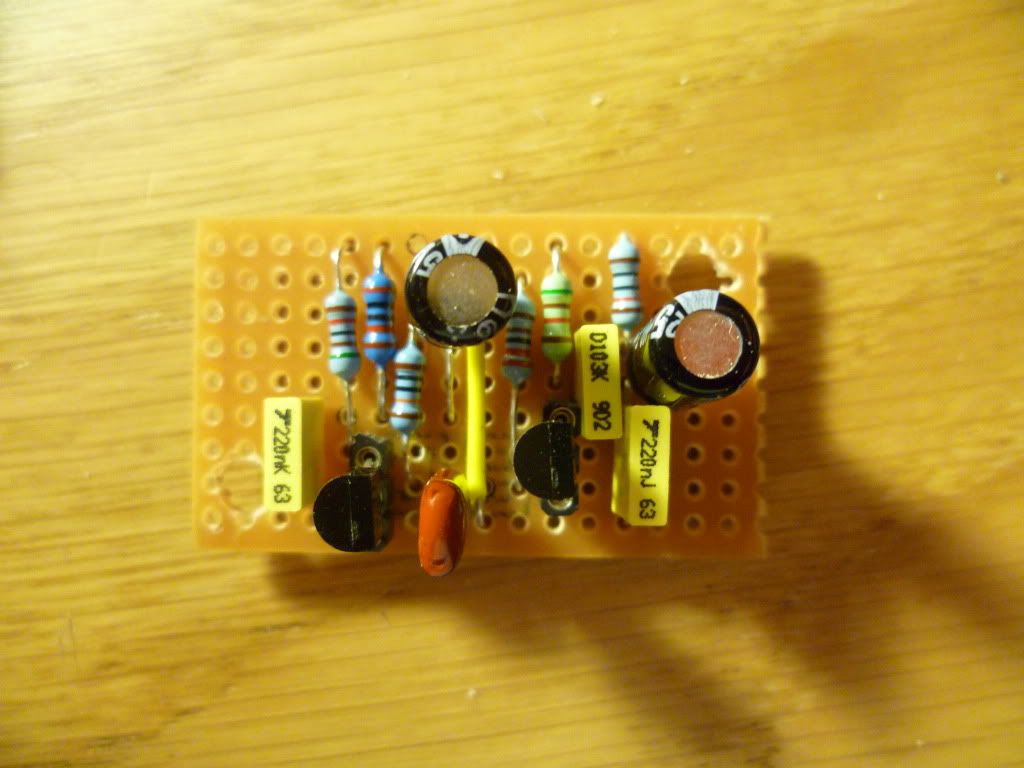
I stared with selecting the components I had to hand. Luckily (not really, cos Id planned, see, Im learning as above) I had the correct selection on components available. I did make one concession, as the 220nF cap in the layout on the right needs to strech over I think 5 holes. I had to get creative with some needle nose pliers to reshape the legs to fit. You can see the results below:
 The keen eyed among you will also note that I have drilled two holes in the vero to allow mounting in the case. This is something I have wanted to do, but needed a big enough case to do it in. At the time of building, the only case I had left was a 120x60x30mm Eddystone case. This, it turns out, is a great sized case for a more roomy build, allowing you a few more luxuries, such as properly mouting your board to the enclosure.
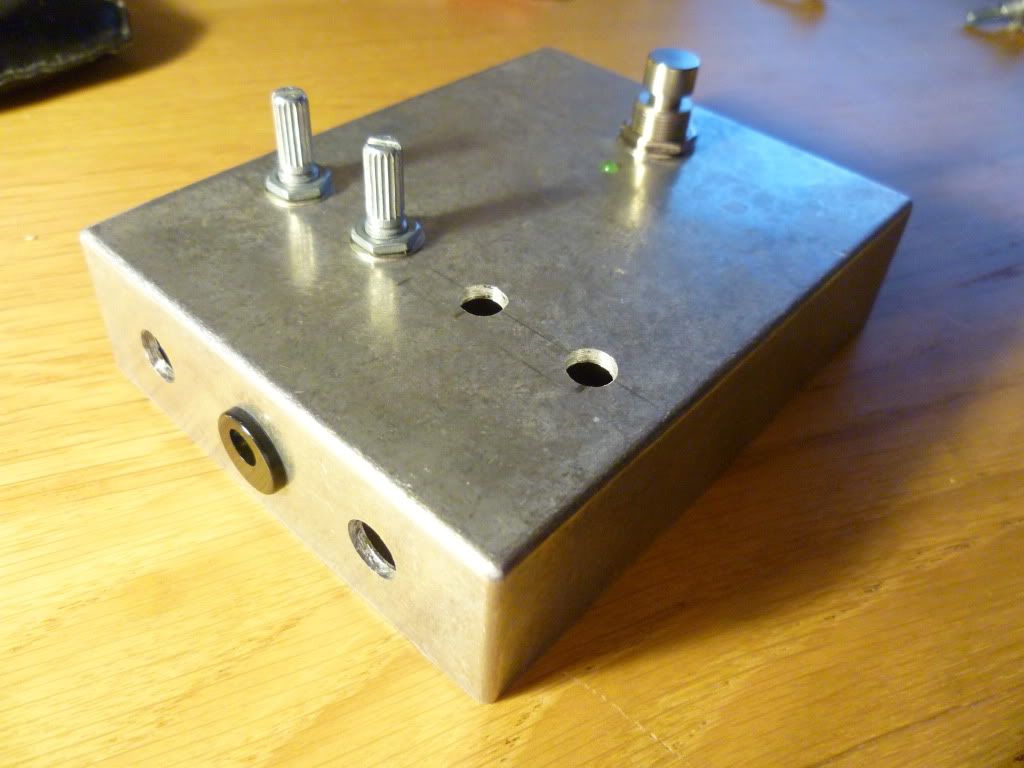
Here is my case, after I had carefully measured out, marked, and drilled for all the components:
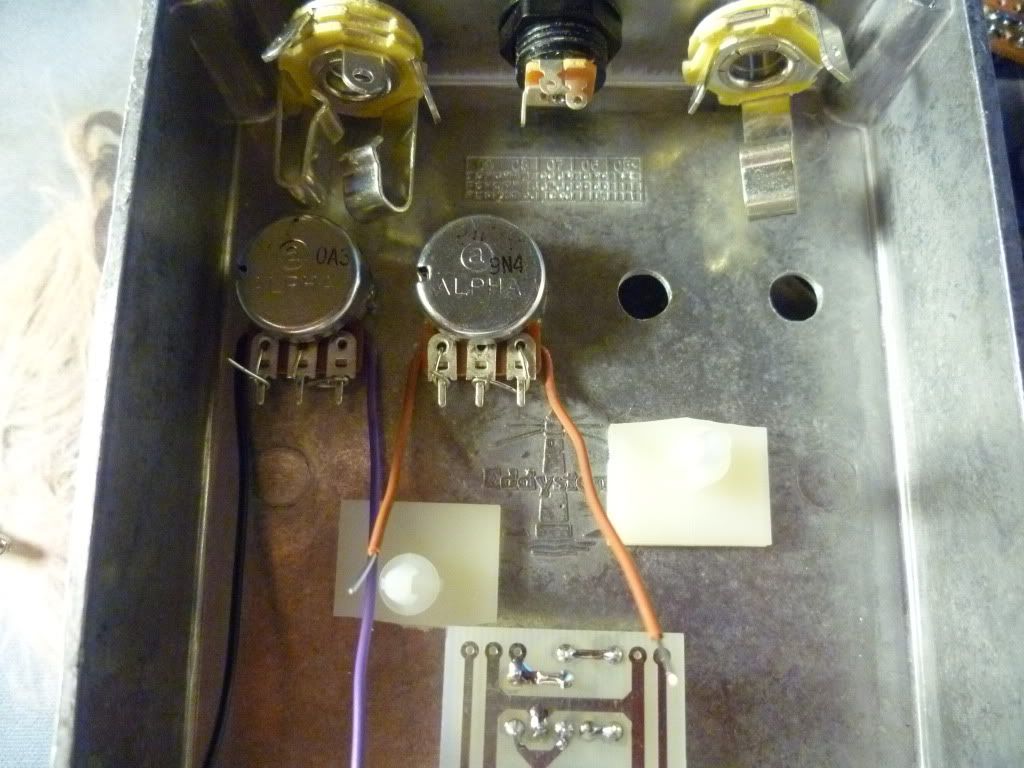
 Ive already fitted a few parts in just to check. For this build, I decided to put the Ins and Outs at the top, as the pedal is quite wide already without having the jacks on the side. I also used a 3mm Green Standard LED. The graphics (when I get round to do them) will hopefully look like the original, which features green heavily, so it should be a nice match. As per my FF build, im using Alpha pots and DPDT, Marks daughter board with millennium bypass, neutrik jacks and a nice 2.1mm german made boss style 9v plug.
As I typically run all my effects by power supply, I want to get away from fitting batteries in my pedals. Also, I find the 9v snaps I have sourced to be of flimsy quality, and very hard to snap on and off a battery.
So, the next step was to fill up the interior of the box to check everything fitted. I took this time also to plan where I would stick the board down. This resulted in me deciding to use a craft knife to "trim" the square sticky feet of the standoffs I bought. You can see this below, hopefully:

Theres loads of room in this case to make a neat and tidy job of the wiring. I have been insipired by some top end builders to try my best with the internal wiring. I have found that solid core hookup cable works the best, and Im using nice different colours from Doctor Tweek for this purpose.
With everything in place, its time to start figuring out the lengths of wires needed to reach from the pots to the board, and then assembling in situ the pots with all the wiring in place, before soldering. I think this is a good way to acheive a neat finish without excess cabling (aka birds nest / bowl of spaghetti) that seems to result from wiring up on your desk, then stuffing into a box, without measuring properly.
So, this is the start of that process for the potentiometers:

As you can see depending on the connection, I like to trim between 1 to 2 cm of insulation from the cable. This is the fed through the eyelet hole at the top near the body of the pot, down to the tang or sticky out bit or lug whatever it is called. I then, in the case of a single lug connection, bend the cable around the lug and back upwards. This can then be soldered and trimmed. In the case of a pot that required a lead to both lugs (in essence a jumper) I use the longer trimmed insulation part, thread through as above, but then after looping round the first lug, jumper it over to the next lug and fold it round again. This provides secure connection, and although the wire goes through the hole, we arent actually soldering at the hole, which as noted might heat-damage the carbon tracks of the potentiometer.
Here is how the first pot in place looks in the build. Note, this is the Wool pot.
 Referring back to the schematic, if we think of the pot facing from the back, the leftmost lug is 3, the middle is 2 and the rightmost is 1. The schematic calls for the purple wire to come from the circuit board to Lug 3. I have cleverly positioned the wire to come out at the right of the pot, minimising the distance to the cicruit board, and poked the wire up through the corresponding hole, and wrapped under and back up over the lug, ending with the wire facing left.
The schematic then asks for lug 2 and 1 to go to ground. The black wire is run behind the pot, up through the hole for lug 2, round the left of lug 2, up over lug 1, then wrapped up and around lug 1 securely. I should note the wiring positioning is done outside the case. I then drop the pot shaft through the correct drilled hole (7mm in the case of these 16mm pots) and then secure with the washer and nut.
As one would expect, this process is complicated slightly when you require jumpers between lugs of two (or more) pots. Using my method, you have to arrange this off the deck so to speak, then transfer two or more pots to the enclosure, which can get a bit fiddly. I think its worth it though.
Here is the next pot, Pinch. Ive used brown wire, its yellow in the schematic. This one is quite simple.
Third pot is the EQ pot. This one needs to be connected to the Output pot. I acheive this by carefully measuring how long the jumper between pots needs to be, then placing the assembled pot into the case. The last pot on the right (Output/Volume) can then be lowered into the drilled spot, and on the way down feed the wire through the correct lug hole.
 Note that the orange cables need to feed into the right hand side of the board. Again, I carefully measured these using the board in place, to ensure I had A) enough length to solder comfortably and B) not too much so it looks a mess. At the end of the build you can judge how much of a success this was :S
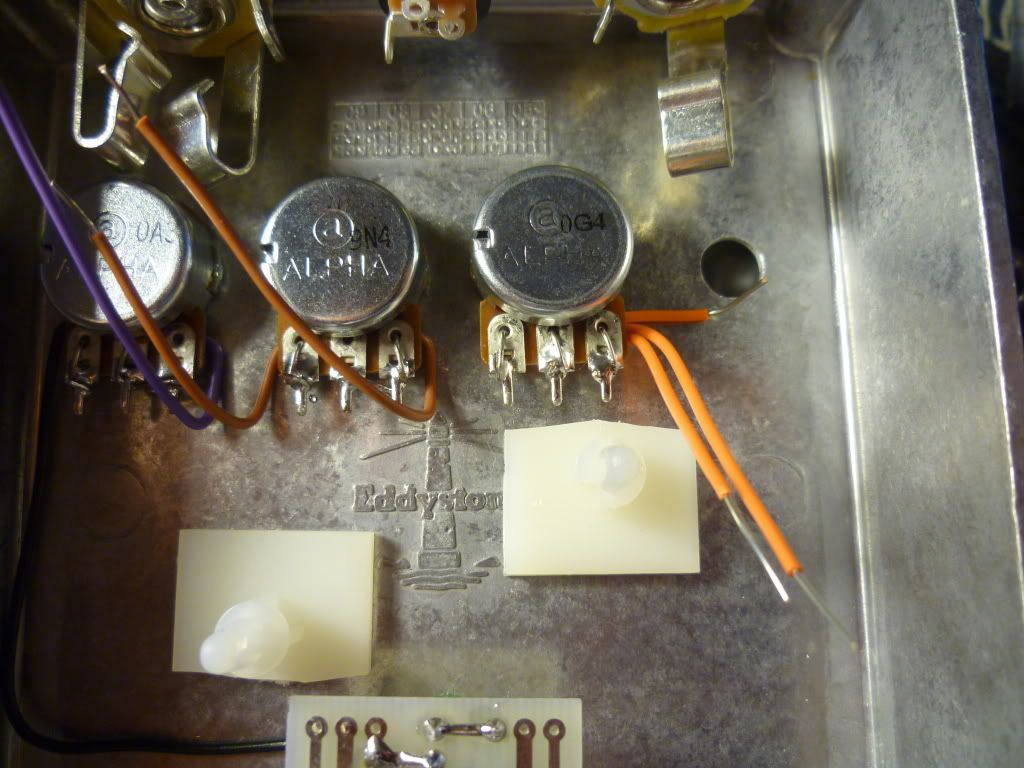
So, the fourth pot in place no, and the keen eyed will see that Ive been doing some soldering in parallel.
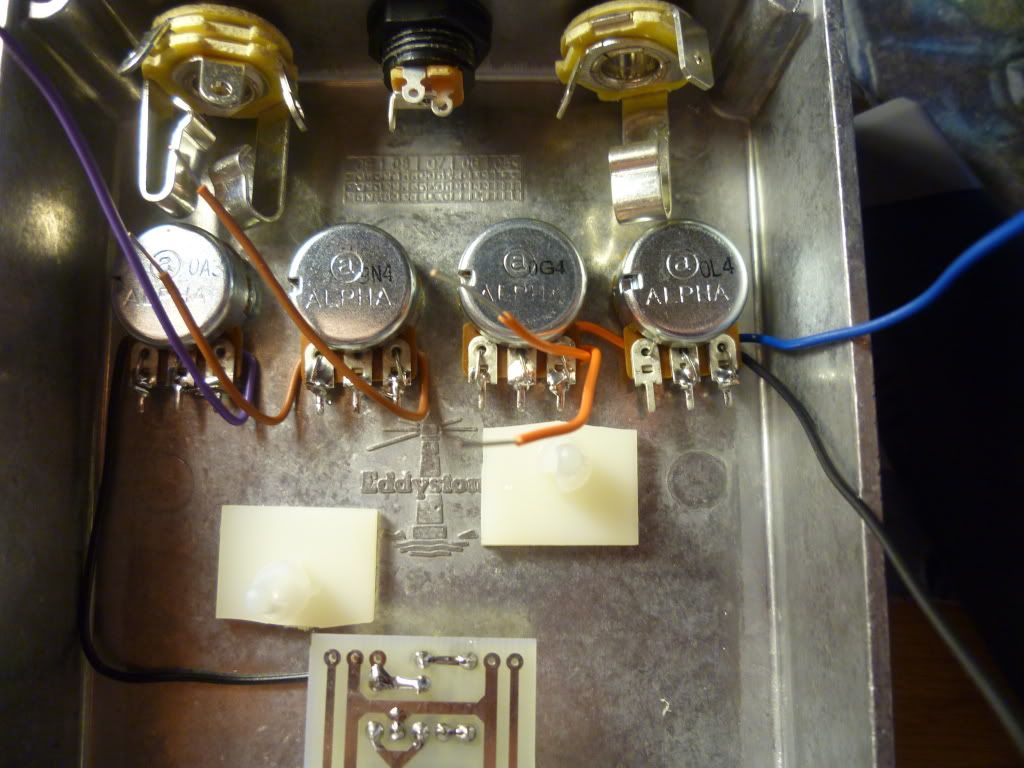
Here you can see the link (orange cable) coming from the EQ pot across to lug 3 of the Output pot. I havent yet fixed this into place yet. Every other pot connection is soldering in place. Black is ground on both the rightmost and leftmost controls. Navy blue is the circuit output, which in time will be wired to my DPDT switching assembly.
The picture below shows the start of the process for wiring everything to the footwitch assembly. You can refer to my FF build for some more info. I'm using a nattily designed and perfectly crafted DPDT daughter board incorporating LED, LED reistor and Millennium bypass circuitry. This shot shows the first of two 9v connections (this one going to the Millenium board, the second one coming later needs to feed the circuit board itself). I have also wired in two of the ground cables, and the circuit output from the Volume pot (blue).
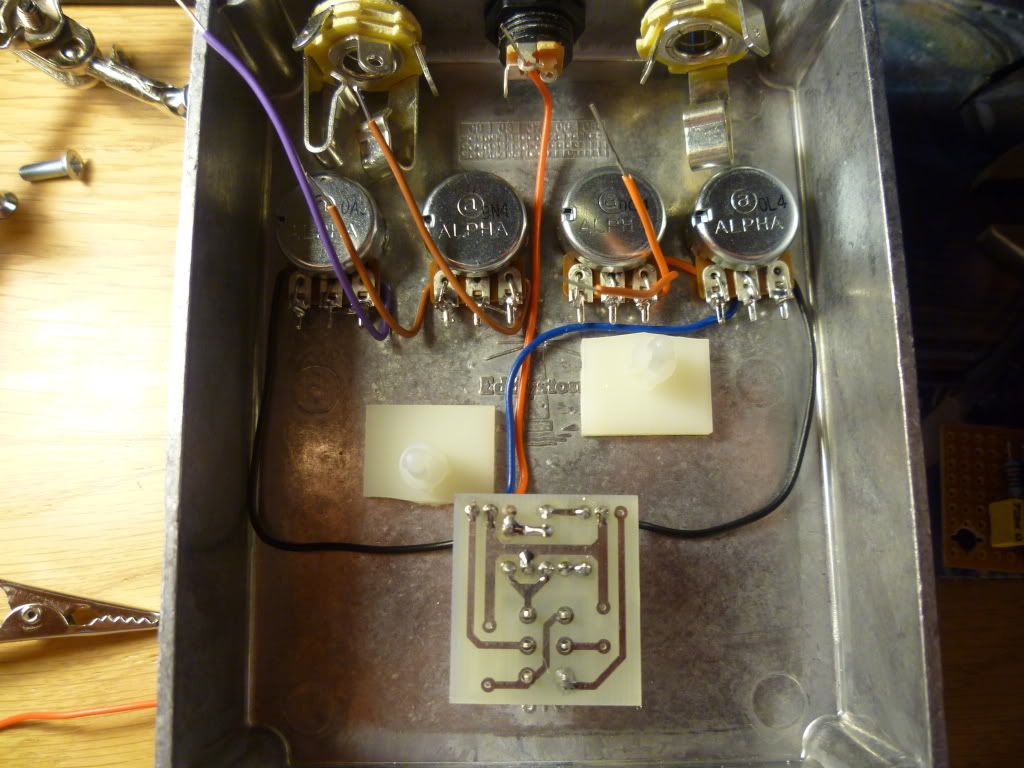
Incremental next step - wire in the second 9v cable (red)
Then its time for really big job. I didnt document this too well as I was too busy concentrating. Basically, we need to make the "offboard" connections to the actual WM circuit board. There are 8 in total, referring back to the schematic above. The orange wires, purple wire, and right most brown wire need to come to the right hand side of the board. I did these first. Then with the board at about a 45 degree angle to the enclosure, I did the connections to the right hand side: +9v power, Input (green) the other brown wire, and the ground (black).
See here for my results:
 You need to plan this kinda stuff carefully. It made perfect sense to wire the right hand side of the board first. Reason being, 4 connections go here, that are already in place connected to the pots. In comparison, only one pot derived connection is going to the left hand side of the board, and a relatively long +9v cable that you can be quite flexible with, before finalising its position in the actual 2.1mm black socket (in this case, top centre of my case). Lastly, the leads for ground and input arent connected to anything, so these are easy to solder in. Just make sure to measure to make them easy to fit to the footswitch of course.
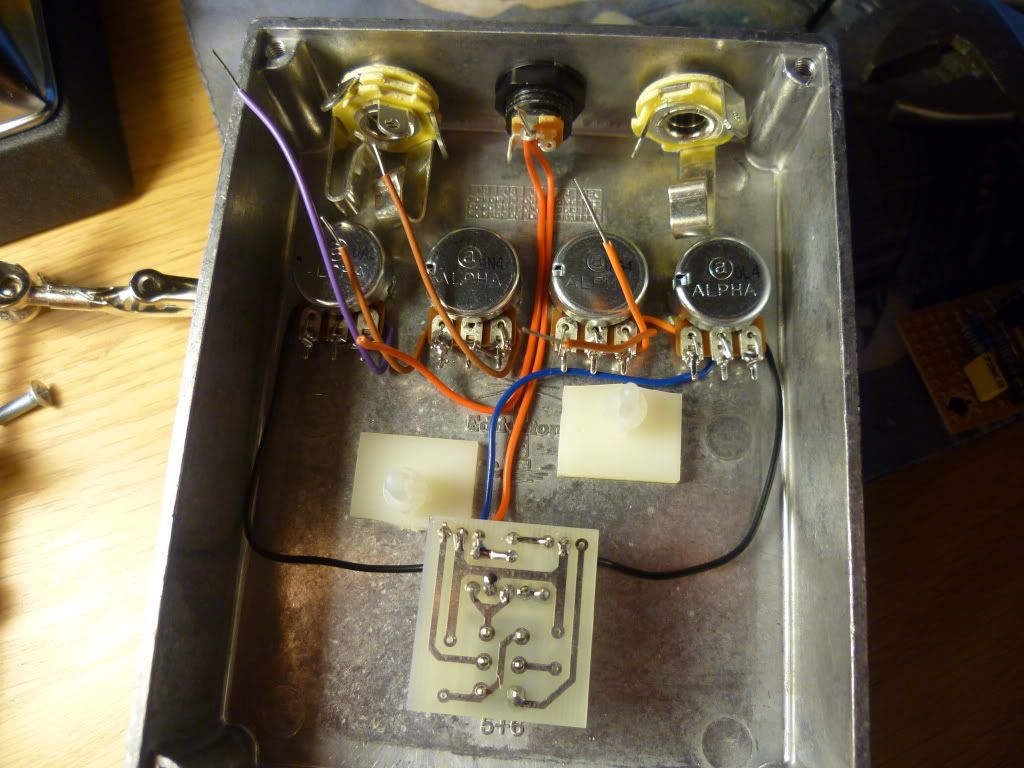
So, we are now at the point where 3 of 4 grounds are wired, the board is in place, the board in and outs are wired, everything that should have power is connected, so whats left?
Well, we need to connect a ground from the pots. I do this by firstly jumpering the ring of the Mono out to the sleeve of the Stereo out, and then using one of the cores of a screened cable, run that to the last of 4 ground points on the Millenium DPDT board. I also need to connect the "-" side of the 9v 2.1mm connector to the ring of the Stereo In jack. Lastly, we need to wire the guitar jack In and Out to the footswitch. For the output, I've used a standard grey wire. For the input, I've used the other core of a screened cable (Van Damme, from Doctor Tweeks). It's the neon orange part, you cant miss it.
So we end up with this:
 I should be fair and say that I didn't measure the screened cable too well, and would have like to have a bit more to play with, still, it works, and it's another learning experience for the next build.
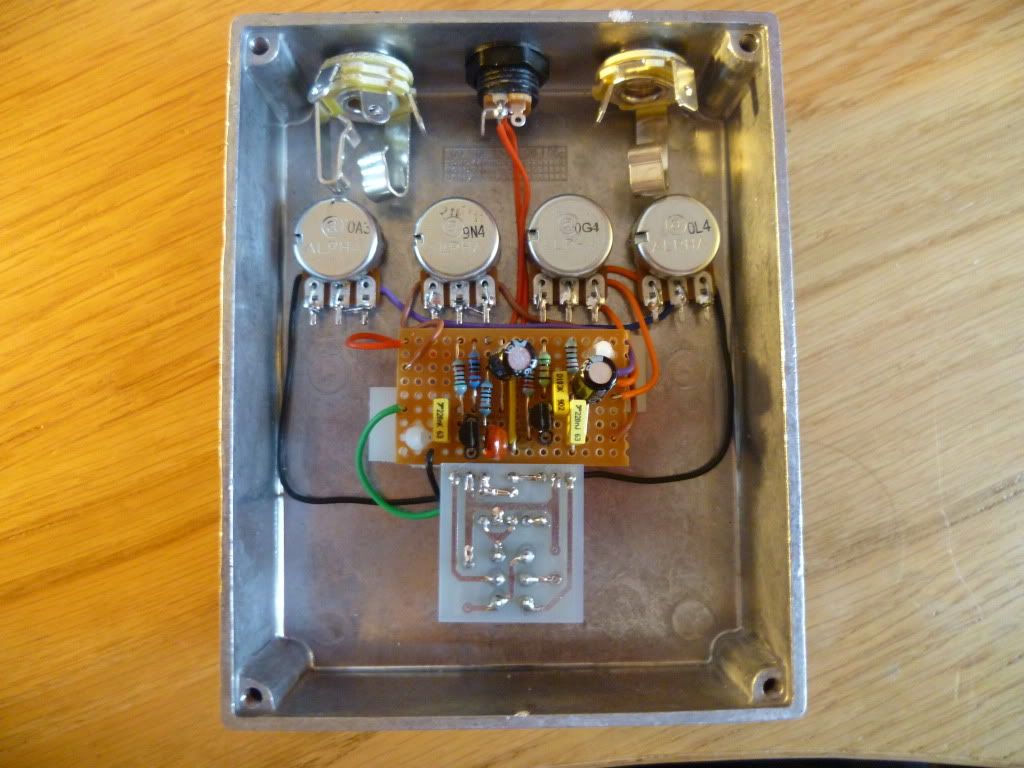
All told this project took me around 6 hours to put together. I started around 5pm - 6pm making the vero board. Then from about 7pm (after food :) ) with the layout, drilling and positioning. Then into the night up til 1am was soldering. I got to the point where I only had the input output and grounds to do. That took me about 20 mins the next day.
The result, avec some nice MXR style knobs, is this:
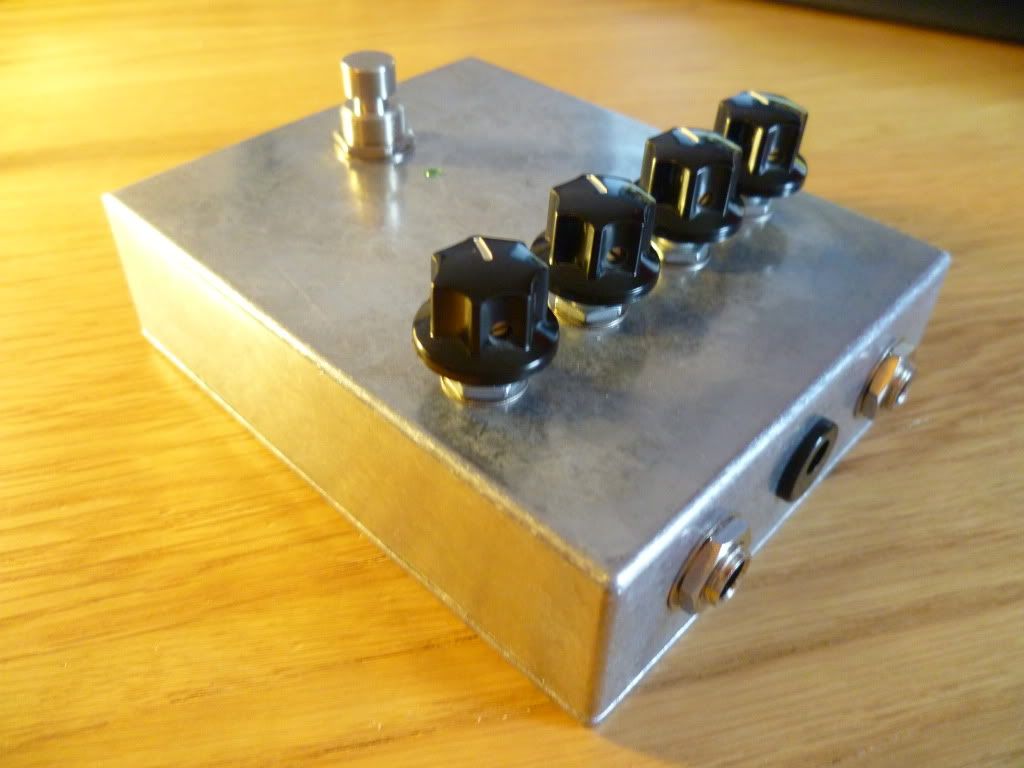
I made a very quick video. Apologies for the sound, it seems my hand was covering the mic at various points, and when I was turning and naming the controls. It sounds absolutely huge, buckets of bass. Sounds awesome on either bass or guitar. The end riffs I played were with a more trebly setting. Beleive me, this is fat fat fat. Kicks the ass of the Big Muff NYC I used to own (was lost or stolen at a gig, lent to bass player :( )
Heres the video
As you can see the green LED is plenty plenty bright! I wont rant more on superbright LEDs but I think ill be using 50k resistors on my remaining ones (!!)
Comments feeback questions Ill do my best to answer :D
Also I reckon this is definitely a step up in the quality of work for me. Its my best build to date, and seeing as its the most recent, that does make common sense. However, my learning process has lead me to one massively important conclusion: It is incredibly important to plan plan plan check and plan again your proposed layout. I dont mean the circuit board, I mean the whole thing: location of the ins and out, location of the power supply, whether or not you want a battery, if so where will it go in the case? Where will the footswitch go? How close to the edge of the case? Do you want the body of the footswitch to act as a "cradle" for a 9v battery to stop it floating around in the case? Where will your circuit board go? How will you make sure it doesnt ground to any parts of the case? etc etc etc
As evident, this isnt an exhaustive list, but from my first build to this, that is the major concern that I have had to address. Otherwise, you soon realise, shit, my board wont fit anywhere, or its gonna touch something, or I dont have any room left for a battery. Anyway, you get the picture.
So, lets begin the build process. Firstly, selecting a circuit. Since I am still at the point of using Vero board, I didnt even considering buying a PCB, but there are commercialy available WM inspired designs, so if you fancy that route you can. Likewise, the Schem is on the net, so feel free to make your own Vero, Perf or other layout. Speaking of which, there are also a number of Vero layouts around. Furry Elephant, Prehistoric Fuzz bla bla. Anyway, I chose to use the freshly verified and beautifully compact layout here: IvIark's WM vero layout

I stared with selecting the components I had to hand. Luckily (not really, cos Id planned, see, Im learning as above) I had the correct selection on components available. I did make one concession, as the 220nF cap in the layout on the right needs to strech over I think 5 holes. I had to get creative with some needle nose pliers to reshape the legs to fit. You can see the results below:
Here is my case, after I had carefully measured out, marked, and drilled for all the components:
As I typically run all my effects by power supply, I want to get away from fitting batteries in my pedals. Also, I find the 9v snaps I have sourced to be of flimsy quality, and very hard to snap on and off a battery.
So, the next step was to fill up the interior of the box to check everything fitted. I took this time also to plan where I would stick the board down. This resulted in me deciding to use a craft knife to "trim" the square sticky feet of the standoffs I bought. You can see this below, hopefully:
Theres loads of room in this case to make a neat and tidy job of the wiring. I have been insipired by some top end builders to try my best with the internal wiring. I have found that solid core hookup cable works the best, and Im using nice different colours from Doctor Tweek for this purpose.
With everything in place, its time to start figuring out the lengths of wires needed to reach from the pots to the board, and then assembling in situ the pots with all the wiring in place, before soldering. I think this is a good way to acheive a neat finish without excess cabling (aka birds nest / bowl of spaghetti) that seems to result from wiring up on your desk, then stuffing into a box, without measuring properly.
So, this is the start of that process for the potentiometers:
As you can see depending on the connection, I like to trim between 1 to 2 cm of insulation from the cable. This is the fed through the eyelet hole at the top near the body of the pot, down to the tang or sticky out bit or lug whatever it is called. I then, in the case of a single lug connection, bend the cable around the lug and back upwards. This can then be soldered and trimmed. In the case of a pot that required a lead to both lugs (in essence a jumper) I use the longer trimmed insulation part, thread through as above, but then after looping round the first lug, jumper it over to the next lug and fold it round again. This provides secure connection, and although the wire goes through the hole, we arent actually soldering at the hole, which as noted might heat-damage the carbon tracks of the potentiometer.
Here is how the first pot in place looks in the build. Note, this is the Wool pot.
The schematic then asks for lug 2 and 1 to go to ground. The black wire is run behind the pot, up through the hole for lug 2, round the left of lug 2, up over lug 1, then wrapped up and around lug 1 securely. I should note the wiring positioning is done outside the case. I then drop the pot shaft through the correct drilled hole (7mm in the case of these 16mm pots) and then secure with the washer and nut.
As one would expect, this process is complicated slightly when you require jumpers between lugs of two (or more) pots. Using my method, you have to arrange this off the deck so to speak, then transfer two or more pots to the enclosure, which can get a bit fiddly. I think its worth it though.
Here is the next pot, Pinch. Ive used brown wire, its yellow in the schematic. This one is quite simple.
Third pot is the EQ pot. This one needs to be connected to the Output pot. I acheive this by carefully measuring how long the jumper between pots needs to be, then placing the assembled pot into the case. The last pot on the right (Output/Volume) can then be lowered into the drilled spot, and on the way down feed the wire through the correct lug hole.
So, the fourth pot in place no, and the keen eyed will see that Ive been doing some soldering in parallel.
Here you can see the link (orange cable) coming from the EQ pot across to lug 3 of the Output pot. I havent yet fixed this into place yet. Every other pot connection is soldering in place. Black is ground on both the rightmost and leftmost controls. Navy blue is the circuit output, which in time will be wired to my DPDT switching assembly.
The picture below shows the start of the process for wiring everything to the footwitch assembly. You can refer to my FF build for some more info. I'm using a nattily designed and perfectly crafted DPDT daughter board incorporating LED, LED reistor and Millennium bypass circuitry. This shot shows the first of two 9v connections (this one going to the Millenium board, the second one coming later needs to feed the circuit board itself). I have also wired in two of the ground cables, and the circuit output from the Volume pot (blue).
Incremental next step - wire in the second 9v cable (red)
Then its time for really big job. I didnt document this too well as I was too busy concentrating. Basically, we need to make the "offboard" connections to the actual WM circuit board. There are 8 in total, referring back to the schematic above. The orange wires, purple wire, and right most brown wire need to come to the right hand side of the board. I did these first. Then with the board at about a 45 degree angle to the enclosure, I did the connections to the right hand side: +9v power, Input (green) the other brown wire, and the ground (black).
See here for my results:
So, we are now at the point where 3 of 4 grounds are wired, the board is in place, the board in and outs are wired, everything that should have power is connected, so whats left?
Well, we need to connect a ground from the pots. I do this by firstly jumpering the ring of the Mono out to the sleeve of the Stereo out, and then using one of the cores of a screened cable, run that to the last of 4 ground points on the Millenium DPDT board. I also need to connect the "-" side of the 9v 2.1mm connector to the ring of the Stereo In jack. Lastly, we need to wire the guitar jack In and Out to the footswitch. For the output, I've used a standard grey wire. For the input, I've used the other core of a screened cable (Van Damme, from Doctor Tweeks). It's the neon orange part, you cant miss it.
So we end up with this:
All told this project took me around 6 hours to put together. I started around 5pm - 6pm making the vero board. Then from about 7pm (after food :) ) with the layout, drilling and positioning. Then into the night up til 1am was soldering. I got to the point where I only had the input output and grounds to do. That took me about 20 mins the next day.
The result, avec some nice MXR style knobs, is this:
I made a very quick video. Apologies for the sound, it seems my hand was covering the mic at various points, and when I was turning and naming the controls. It sounds absolutely huge, buckets of bass. Sounds awesome on either bass or guitar. The end riffs I played were with a more trebly setting. Beleive me, this is fat fat fat. Kicks the ass of the Big Muff NYC I used to own (was lost or stolen at a gig, lent to bass player :( )
Heres the video
As you can see the green LED is plenty plenty bright! I wont rant more on superbright LEDs but I think ill be using 50k resistors on my remaining ones (!!)
Comments feeback questions Ill do my best to answer :D
Postman has been....
Did my first order from Rapid UK.
Items ordered Friday, received around 11am yesterday, good service, then again I expect that for £5 flat rate. At least I know now that it is a 24 hour service.
Anyway, I stocked up on Eddystone (Hammond Manufacturing) cases.
I got two of the larger size and three of the MXR type size.
If you are interested, the product codes and sizes are:
Bigger - 29830PSLA 120x95x30MM (£5.10ea)
Smaller - 27134PLSA 111x60x31MM (£2.95ea)
More sizes here: Rapid Eddystone Selection
They are great quality. They dont have as nice rounded edges as the Hammond 1590 series, but they are about half the price. In my opinion, they look just as good as any other boutique pedal case of the standard diecast rectangular variety.
I also bought 10x more of their Alpha DPDT footswitches. For one, Im hoping I can snag some more daughter boards off IvIark in the future, or source someone to manufacturer them for me (group buy, anyone?!) and also in some future designs I want to use footswitches for mode selection (Im thinking the Devi Ever type effects with Choas and Noise modes, or switchable caps, or maybe wiring a boost in the same box for instance). I am half toying with the idea of having an octave circuit in with a Red Llama to make a knock-off Piercing Moose. Maybe the Green Ringer. Lastly I got 2 each of some plastic Rean by Neutrik jacks to have a try with. about 50p each...
Anyway, I thought it would be fun to note that I received two decent sized boxes. One contained the 5 cases and footswitches. Fair use of space I reckon. The other contained one axial cap, and another cap. LOL.
Reasonable packing:


Coming soon: Comprehensive and picture intensive WM build !
Items ordered Friday, received around 11am yesterday, good service, then again I expect that for £5 flat rate. At least I know now that it is a 24 hour service.
Anyway, I stocked up on Eddystone (Hammond Manufacturing) cases.
I got two of the larger size and three of the MXR type size.
If you are interested, the product codes and sizes are:
Bigger - 29830PSLA 120x95x30MM (£5.10ea)
Smaller - 27134PLSA 111x60x31MM (£2.95ea)
More sizes here: Rapid Eddystone Selection
They are great quality. They dont have as nice rounded edges as the Hammond 1590 series, but they are about half the price. In my opinion, they look just as good as any other boutique pedal case of the standard diecast rectangular variety.
I also bought 10x more of their Alpha DPDT footswitches. For one, Im hoping I can snag some more daughter boards off IvIark in the future, or source someone to manufacturer them for me (group buy, anyone?!) and also in some future designs I want to use footswitches for mode selection (Im thinking the Devi Ever type effects with Choas and Noise modes, or switchable caps, or maybe wiring a boost in the same box for instance). I am half toying with the idea of having an octave circuit in with a Red Llama to make a knock-off Piercing Moose. Maybe the Green Ringer. Lastly I got 2 each of some plastic Rean by Neutrik jacks to have a try with. about 50p each...
Anyway, I thought it would be fun to note that I received two decent sized boxes. One contained the 5 cases and footswitches. Fair use of space I reckon. The other contained one axial cap, and another cap. LOL.
Reasonable packing:

Fail Packing:

Coming soon: Comprehensive and picture intensive WM build !
Monday, 21 February 2011
Current Set Up
For the music project I am working on right now (with the singer and drummer of my previous band) this the setup I am using. Might not look like too much but you can do a lot with it.
This is the pedal board. Its a while since I wired it up, using George L's. I dont buy into the hype with George L's I did it solely for the customisable lengths of patches. The signal path is, I beleive
Tuner > Overdrive > Chorus > Delay > Space Station > Slicer > DL-4 (Looper).


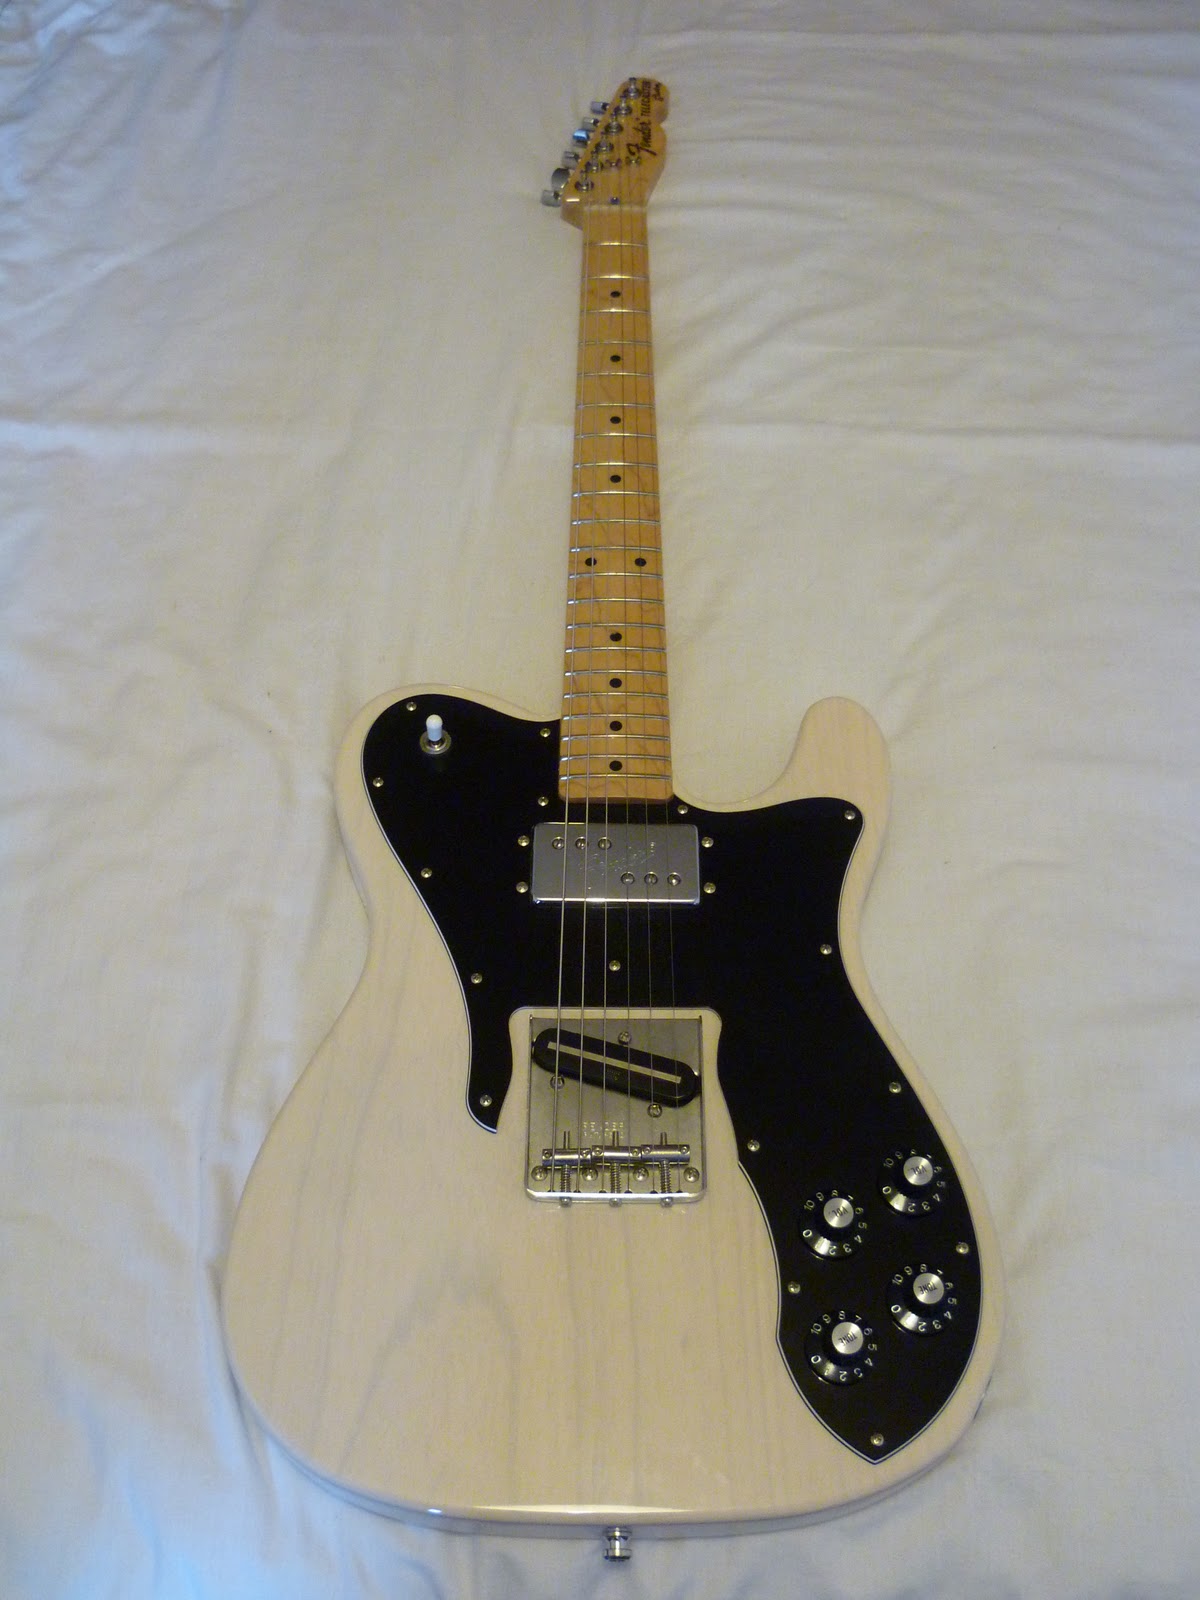
Main guitars right now are my most recent acquisition, a Fender MIJ '72 reissue custom. The finish is not-for-export "USA Blonde" so a see through white. The body certainly looks to be 1 peice. Its a lovely guitar.
The bridge has a Seymour Duncan Hot Stack.
 Otherwise its my Stratocaster. I was after a hard tail strat, and they arent easy to find in the Fender catalogue. This is a 2008 Billy Corgan USA signature. The neck is amazing.

Maybe down the line Ill post up my other gear, but I mainly did this for the pedal board shot. Hopefully some stuff I build will squeeze on there. Bass at band practice will be going through the Zvex FF and WM for sure.
This is the pedal board. Its a while since I wired it up, using George L's. I dont buy into the hype with George L's I did it solely for the customisable lengths of patches. The signal path is, I beleive
Tuner > Overdrive > Chorus > Delay > Space Station > Slicer > DL-4 (Looper).

This gets sent, via a Kaoss pad, to my pride and joy, Blackstar Artisan Handwired Combo. This amp is awesome. Enough said. I rate it very highly, and sold a Fender Twin (also a great amp) to get it. I also have a Fender Hot Rod amp for stereo.

Main guitars right now are my most recent acquisition, a Fender MIJ '72 reissue custom. The finish is not-for-export "USA Blonde" so a see through white. The body certainly looks to be 1 peice. Its a lovely guitar.
The bridge has a Seymour Duncan Hot Stack.

Maybe down the line Ill post up my other gear, but I mainly did this for the pedal board shot. Hopefully some stuff I build will squeeze on there. Bass at band practice will be going through the Zvex FF and WM for sure.
A history of my guitar effects purchases: Part Four "Left overs and Clones".
My last post of the subject of my effects.
A big massive pedal that I didnt include in the Part 2, that maybe should have been, is the Line 6 DL-4.
This is the huge green delay looper pedal. I use this all the time but not for delays, more for its 24 second loop. Its really great as you can record in half time, and play back in real time, so it coverts the pitch and speed (really high pitch and fast is my fave). You can also reverse loops. Theres better loopers out there, but this is the one I have, and it has four switches so its easy to use. I think something like the new small red Boss Loop station would be good, but I cant think its practical with one switch. That mean expression switches, and then its about teh size of the DL-4 again.
Anyway. Everyone knows these, but here you go:

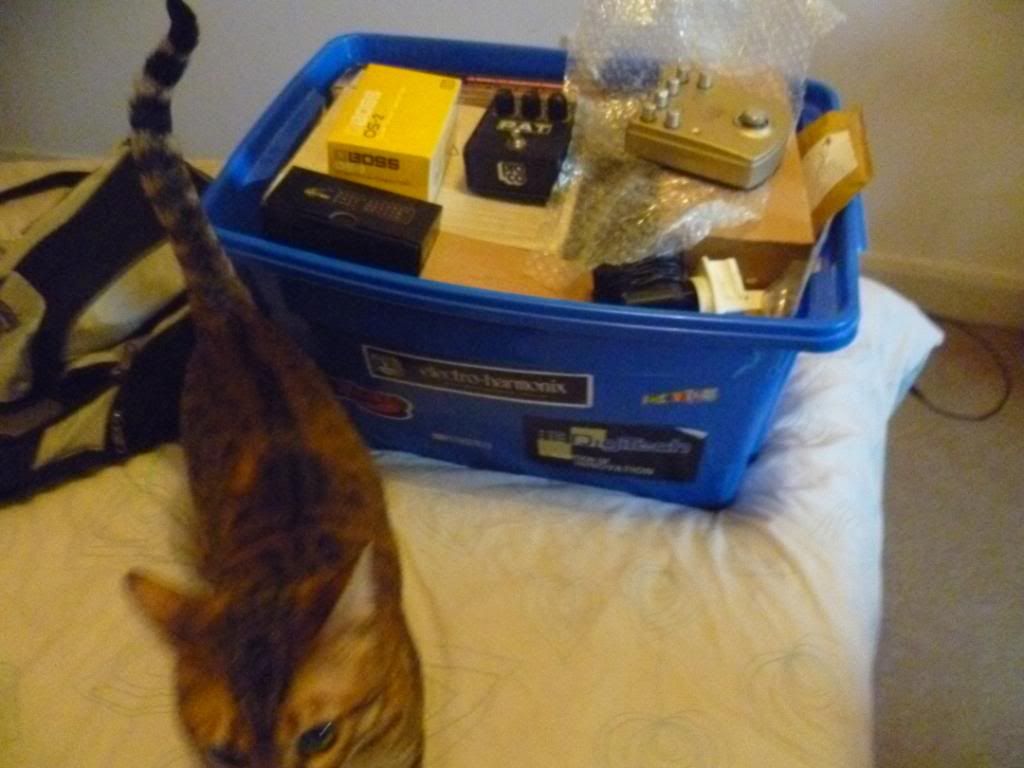
Another oddity in my big blue box of pedals, is this Korg Toneworks Distortion device. Its quite cool, has two footswitchable presets voices, which you can customise using the knobs and save. It also has a simulated recording output/speaker emulator, I should really try that into my PC sometime.

Speaking of my big blue box of pedals, here it is, with one of my cats who was very intrigued as to why the box was now on the bed she was sleeping on =^-^=
The last few pedals I wanna describe as from three categories. First up is the category of "this pedal is currently clonable via PCB sellers". You could of course include the RAT in here, and maybe a couple others of my effect. But this one goes in here. Ill come back to it in a sec. The second category is gonna be old school clones. I mentioned in Part 3 I have a couple of Ross pedals, so Ill show those off. And thirdly, I wanna introduce a new sector of effects: The grey import. Chinese made, mass produced, often SMD based rips offs of current or classic FX.
So First up, currently clonable.
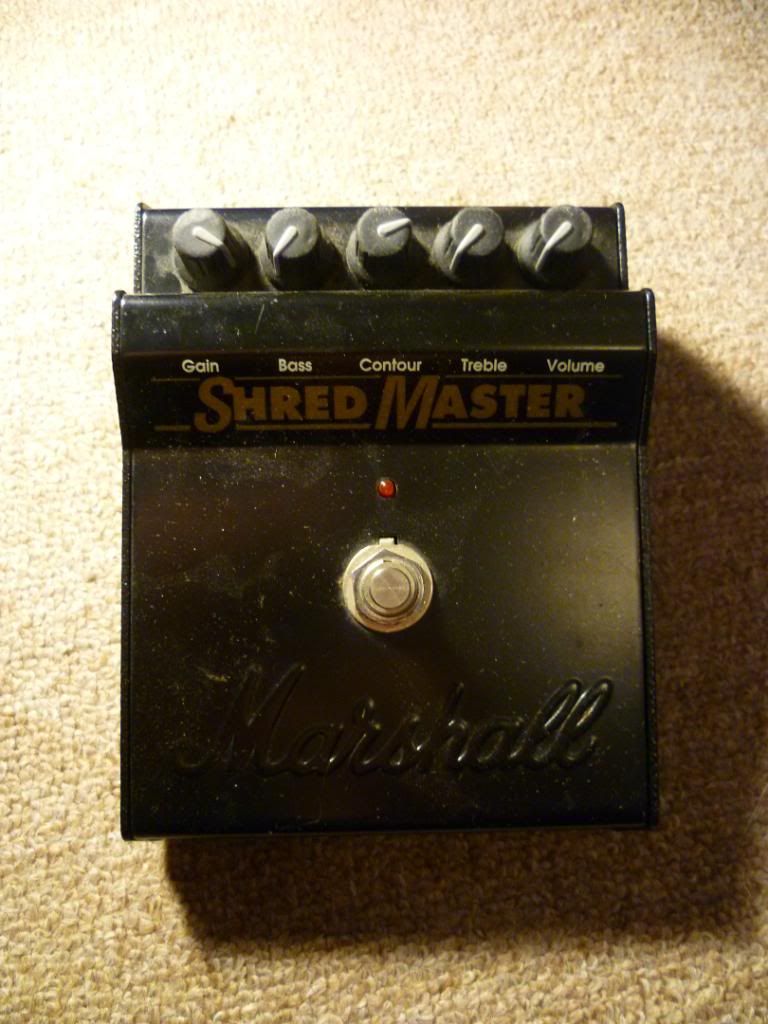
Here is a classic example of pedal that is actively cloned. you can buy PCBs. there are veros/schematics around. Its the 5 knob beast that is the Marshall Shredmaster. Most famous I think because of Kevin Shields (My Bloody Valentine). I dont really like it, and its my mates, but I keep it for some reason. Anyway, its a real one, woo.
Second category: old school clones.
Nowadays there are numerous far eastern companies pumping out clones. Back in the day Ross were one of the best. I happen to own a Ross Chorus, based on the lovely CE-2 from Boss. That pedal offers great analog chorus sounds, using the proper bonafiade Panasonic BBD chips. The chip is worth more than I paid for the whole pedal. The original CE-2 go for silly money nowadays.
The other one is im fair sure a verbatin repro of a MXR distortion+ (the much loved little yellow 2 knobber).
Both these effects sound great, use great parts inside and work a treat. The boxes are also really nice and the knobs have a great feel to them. Keep an eye out for these, and the venerable Ross compressor, on which many current boutique clones are based.
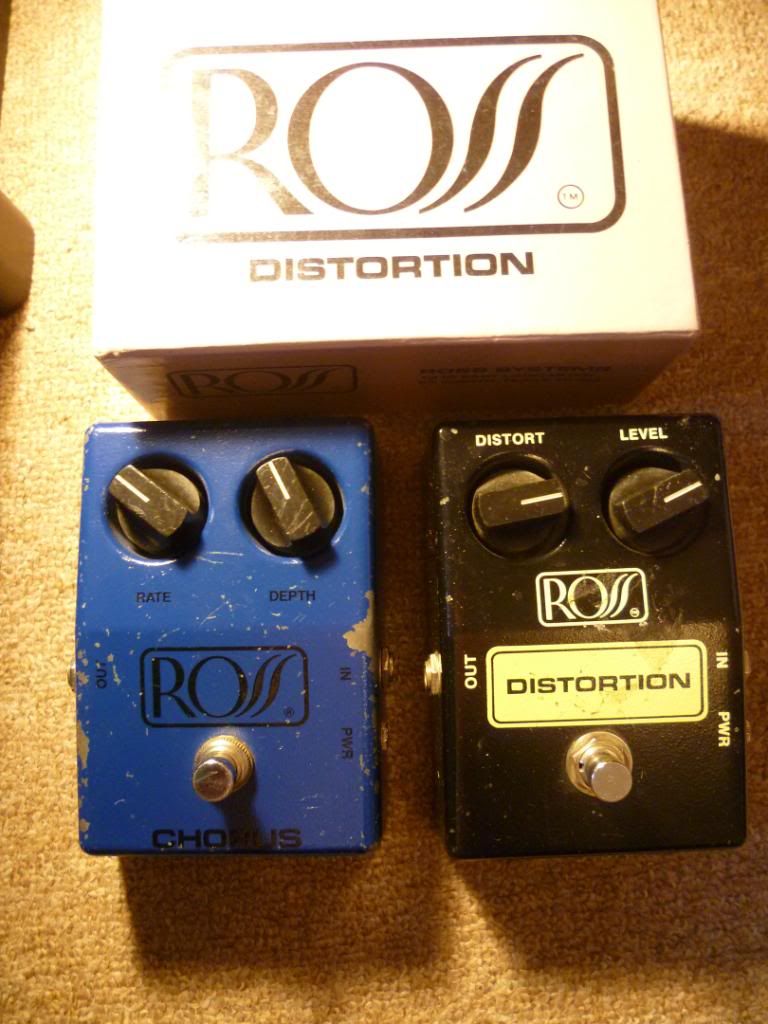
So. Theres two examples of vintage clones. So, as we know cloning isnt a new thing.
Im all for a good deal, so the next two pedals I wanna show you hail from China, in what I see as a big influx of cheap, well made, versatile pedals. Some are based off well known designs, other not. One big guilty party is Daneletro, who have got into trouble recently cloning directly from current production boutique pedals (see FSB et al for some controversy on their copy of the Paul Cochrane Timmy). They also offer a fairly obvious Fulltone OCD tribute among others.
anyway, first up Biyang. I found these via ebay. They have the 8 series, which are lovely Chrome boxed True Bypass pedals with coloured LEDs. Check them out via there uk dealer HERE
They offer a range which from memory is this:
Fuzz - switchable fuzz based on the Fuzz Face and Big Muff
Mouse - based on the rat, with 3 way "original / Rat 2 / Turbo rat" mode switch
Chorus - based on the Boss CE - 2 with added tone control
Flanger - based on the Ibanez analog flanger
Overdrive - a TS clone, with user accesible socket and includes 3 chips inc a JRC4558d.
Distortion - a MXR D+ clone
Delay - a PT2999 based analog voiced digital delay (they call it analog, but it isnt really)
Phase - clone of the MXR phase 100
They also offer a recently instroduced 10 series called Baby Boom, which include some of the above reboxed in small colourful MXR sized housings. This also includes a stereo In AND Out reverb pedal, which looks awesome.
Anyway, I have the Chorus. Its tremendous, and well worth the £40 paid.

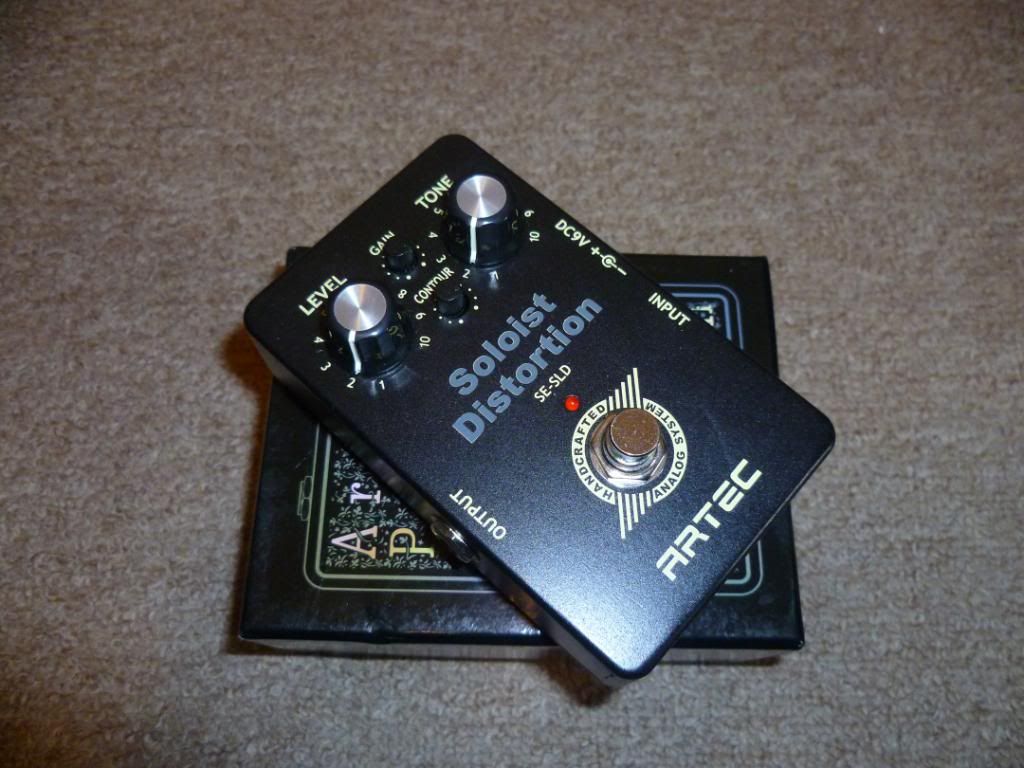
On the topic, there are a number of these companies, Biyang, Belcat, Artec. I have an Artec Soloist Distortion that I bought on a whim after watching a cool youtube video. Sadly it doesnt sound as nice in my hands but its a good distortion pedal. The build quality is nice, and the stompswitch is great.
These effects can be had for around the £20 - £40 price range, Belcat being at the lower end. See the UK distro page.
Which brings me to my point. With reasonably well made pedals starting at £20 for popular sounds, "inspired" shall we say by, nice vintage or current boutique effects, is it worth the time and effort to build one yourself? I say yes, as the satisfaction and personal touch make it 100% worth it. But, as I advised someone recently who was in a band with a multifx and wanted to get into individual pedals and wanted to know some tips on building one, I couldnt really recommend it. With such affordable and good sounding pedals available these days, it makes no sense for the gigging musician without the prior motivation to set about buying the necessary tools and parts to make some FX. You can get in the ball park with these for pocket money.
I figure that even if you go with teh nicer 8 or 10 series biyangs, you would have your pick of 2 dirt boxes, delay, chorus, and one other with change from £200. You cant do that with Boss, MXR or ibanez for example, but the pedals are all based on them. Counting my limited experience with the Biyang Chorus, I woulnt have any problem gigging with a whole pedal board of these. In the case of the 10 series, they even looks like super cool boutique effects(!)
Example

Worth noting also, if you are tempted with a Modtone pedal. they may look fancy, but they are made in exactly the same place as the artec, and save for the paintjob, im very confident, as are other people, that its 100% the same thing. Save yourself half the price tag and find the corresponding Artec version.
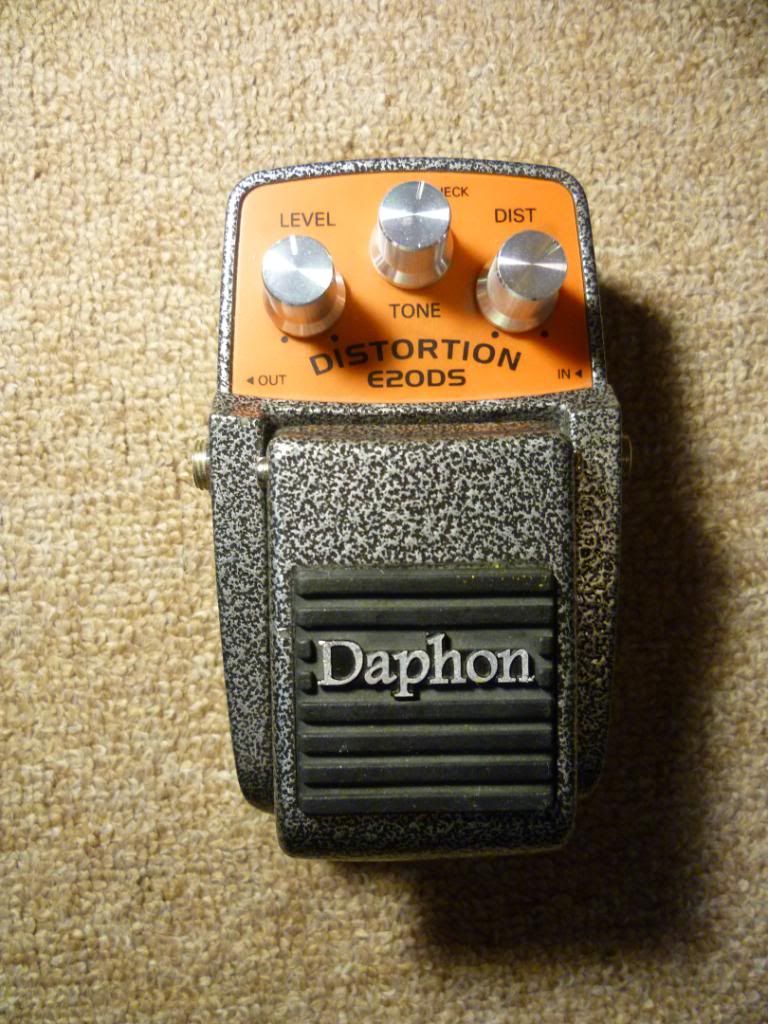
Lastly, I couldnt end the blog without including the cheapest pedal Ive ever bought. This Daphon is a fairly blatant clone of a Boss DS-1, and sounds ok. I messed up the footswitch having a tinker, so I might actually rexob this one day. This was mine for the princely sum of £5. :)
Adios for now. Im hoping to find some time to build a Wolf Computer and a Red Llama, however I need to go to Ireland this week for work, then Im off to San Francisco for 10 days (work and play). Maybe ill pick up a souvenir pedal while Im out there. I quite like the look of the new TC Electronic Compact Line
A big massive pedal that I didnt include in the Part 2, that maybe should have been, is the Line 6 DL-4.
This is the huge green delay looper pedal. I use this all the time but not for delays, more for its 24 second loop. Its really great as you can record in half time, and play back in real time, so it coverts the pitch and speed (really high pitch and fast is my fave). You can also reverse loops. Theres better loopers out there, but this is the one I have, and it has four switches so its easy to use. I think something like the new small red Boss Loop station would be good, but I cant think its practical with one switch. That mean expression switches, and then its about teh size of the DL-4 again.
Anyway. Everyone knows these, but here you go:
Another oddity in my big blue box of pedals, is this Korg Toneworks Distortion device. Its quite cool, has two footswitchable presets voices, which you can customise using the knobs and save. It also has a simulated recording output/speaker emulator, I should really try that into my PC sometime.
Speaking of my big blue box of pedals, here it is, with one of my cats who was very intrigued as to why the box was now on the bed she was sleeping on =^-^=
The last few pedals I wanna describe as from three categories. First up is the category of "this pedal is currently clonable via PCB sellers". You could of course include the RAT in here, and maybe a couple others of my effect. But this one goes in here. Ill come back to it in a sec. The second category is gonna be old school clones. I mentioned in Part 3 I have a couple of Ross pedals, so Ill show those off. And thirdly, I wanna introduce a new sector of effects: The grey import. Chinese made, mass produced, often SMD based rips offs of current or classic FX.
So First up, currently clonable.
Here is a classic example of pedal that is actively cloned. you can buy PCBs. there are veros/schematics around. Its the 5 knob beast that is the Marshall Shredmaster. Most famous I think because of Kevin Shields (My Bloody Valentine). I dont really like it, and its my mates, but I keep it for some reason. Anyway, its a real one, woo.
Second category: old school clones.
Nowadays there are numerous far eastern companies pumping out clones. Back in the day Ross were one of the best. I happen to own a Ross Chorus, based on the lovely CE-2 from Boss. That pedal offers great analog chorus sounds, using the proper bonafiade Panasonic BBD chips. The chip is worth more than I paid for the whole pedal. The original CE-2 go for silly money nowadays.
The other one is im fair sure a verbatin repro of a MXR distortion+ (the much loved little yellow 2 knobber).
Both these effects sound great, use great parts inside and work a treat. The boxes are also really nice and the knobs have a great feel to them. Keep an eye out for these, and the venerable Ross compressor, on which many current boutique clones are based.
So. Theres two examples of vintage clones. So, as we know cloning isnt a new thing.
Im all for a good deal, so the next two pedals I wanna show you hail from China, in what I see as a big influx of cheap, well made, versatile pedals. Some are based off well known designs, other not. One big guilty party is Daneletro, who have got into trouble recently cloning directly from current production boutique pedals (see FSB et al for some controversy on their copy of the Paul Cochrane Timmy). They also offer a fairly obvious Fulltone OCD tribute among others.
anyway, first up Biyang. I found these via ebay. They have the 8 series, which are lovely Chrome boxed True Bypass pedals with coloured LEDs. Check them out via there uk dealer HERE
They offer a range which from memory is this:
Fuzz - switchable fuzz based on the Fuzz Face and Big Muff
Mouse - based on the rat, with 3 way "original / Rat 2 / Turbo rat" mode switch
Chorus - based on the Boss CE - 2 with added tone control
Flanger - based on the Ibanez analog flanger
Overdrive - a TS clone, with user accesible socket and includes 3 chips inc a JRC4558d.
Distortion - a MXR D+ clone
Delay - a PT2999 based analog voiced digital delay (they call it analog, but it isnt really)
Phase - clone of the MXR phase 100
They also offer a recently instroduced 10 series called Baby Boom, which include some of the above reboxed in small colourful MXR sized housings. This also includes a stereo In AND Out reverb pedal, which looks awesome.
Anyway, I have the Chorus. Its tremendous, and well worth the £40 paid.
On the topic, there are a number of these companies, Biyang, Belcat, Artec. I have an Artec Soloist Distortion that I bought on a whim after watching a cool youtube video. Sadly it doesnt sound as nice in my hands but its a good distortion pedal. The build quality is nice, and the stompswitch is great.
These effects can be had for around the £20 - £40 price range, Belcat being at the lower end. See the UK distro page.
Which brings me to my point. With reasonably well made pedals starting at £20 for popular sounds, "inspired" shall we say by, nice vintage or current boutique effects, is it worth the time and effort to build one yourself? I say yes, as the satisfaction and personal touch make it 100% worth it. But, as I advised someone recently who was in a band with a multifx and wanted to get into individual pedals and wanted to know some tips on building one, I couldnt really recommend it. With such affordable and good sounding pedals available these days, it makes no sense for the gigging musician without the prior motivation to set about buying the necessary tools and parts to make some FX. You can get in the ball park with these for pocket money.
I figure that even if you go with teh nicer 8 or 10 series biyangs, you would have your pick of 2 dirt boxes, delay, chorus, and one other with change from £200. You cant do that with Boss, MXR or ibanez for example, but the pedals are all based on them. Counting my limited experience with the Biyang Chorus, I woulnt have any problem gigging with a whole pedal board of these. In the case of the 10 series, they even looks like super cool boutique effects(!)
Example

Worth noting also, if you are tempted with a Modtone pedal. they may look fancy, but they are made in exactly the same place as the artec, and save for the paintjob, im very confident, as are other people, that its 100% the same thing. Save yourself half the price tag and find the corresponding Artec version.
Lastly, I couldnt end the blog without including the cheapest pedal Ive ever bought. This Daphon is a fairly blatant clone of a Boss DS-1, and sounds ok. I messed up the footswitch having a tinker, so I might actually rexob this one day. This was mine for the princely sum of £5. :)
Adios for now. Im hoping to find some time to build a Wolf Computer and a Red Llama, however I need to go to Ireland this week for work, then Im off to San Francisco for 10 days (work and play). Maybe ill pick up a souvenir pedal while Im out there. I quite like the look of the new TC Electronic Compact Line
A history of my guitar effects purchases: Part Three "BOSS (and friends)".
Its probably apparent already that I am not what one would refer to as a tone snob, pedal snob whatever. I dont demand true bypass of my effects. I run with Digital effects. I am not a purist in any sense other than my own rule of " I use what *I* like and think sounds good". Otherwise, there isnt any rules. Cheap, expensive, big, small, plastic case, tank-like-steel case. You get the picture.
Having said that, however, I can almost guarantee even those most devout of purists own at least one boss pedal somewhere along the line, even if it is a hallowed DM delay or CE chorus from the golden 80s era (Made in Japan, with silver battery door knobs, and green labels...no wait, pink...no wait, black...aah I forget...)
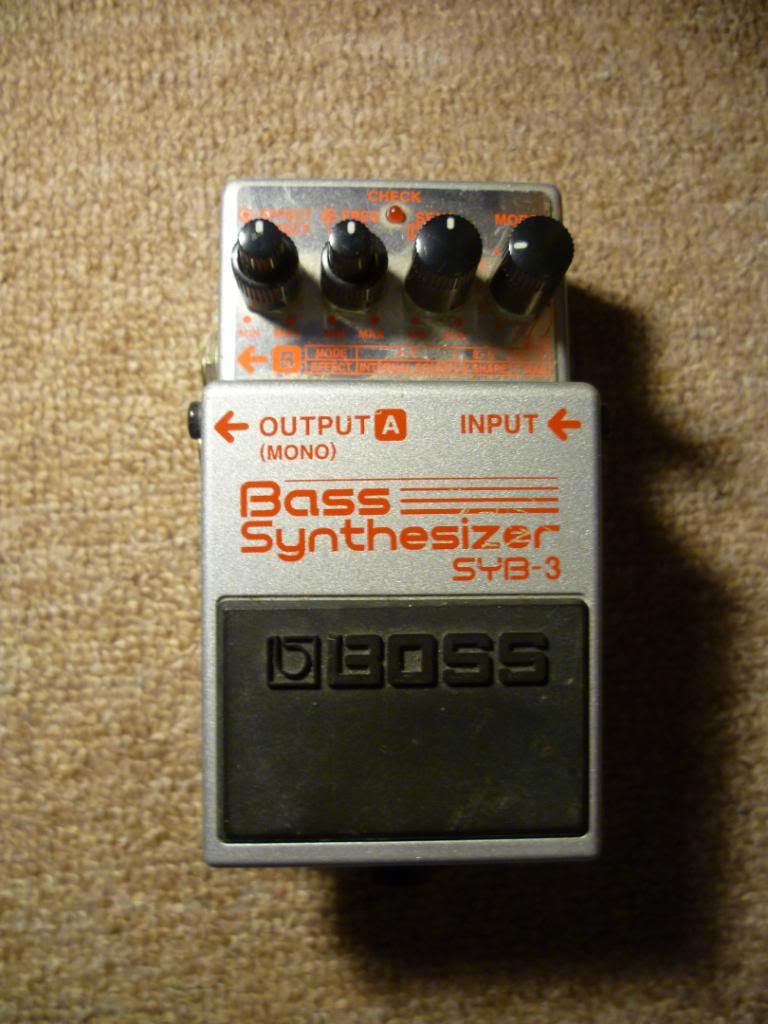
I have a fairly broad history of BOSS effects pedals. Already seen in History lesson 1, I have a Boss SYB-3 Bass Synthesiser. This is brilliant for stupid triggered bleeps and filters. It works on bass and guitar equally well, as it has a sensitivity control. It also has nice usuable envelope filters, which sweep both up and down (think Mutron 3 if you dont know what an envelope filter is, or Auto Wah, for those less sophisitcated). Its a wah that gets more bright (or bassy) on how hard you pick. This box also expands on that by having envelope filter with square wave, which sounds awesome.
I recently sold the old stalwart favourite, a Boss DD-3 delay. This is your run of the mill 800ms digital delay. Nothing special. Industry standard if you will. I cant even be bothered to source a google image, cos if you dont know what one of those is, you probably wont be interested in this blog :D

Also one that got away was a Boss SD-1. Really, its an overdrive. Like a tubescreeamer. No need to elaborate.
Speaking of overdrives, a pedal I really do like and still use, which was an early purchase, was the OS-2 Overdrive/Distortion. This is a cool pedal. Its kinda like a SD-1 and a DS-1 in one box, with blendable voice control. At one end of the voice you have the overdrive, the other the harder distortion, and all colours in between. The you have the standard Output, Tone and Drive controls. I feel, an underrated beast indeed.

I mentioned the Boss DD line breifly earlier.
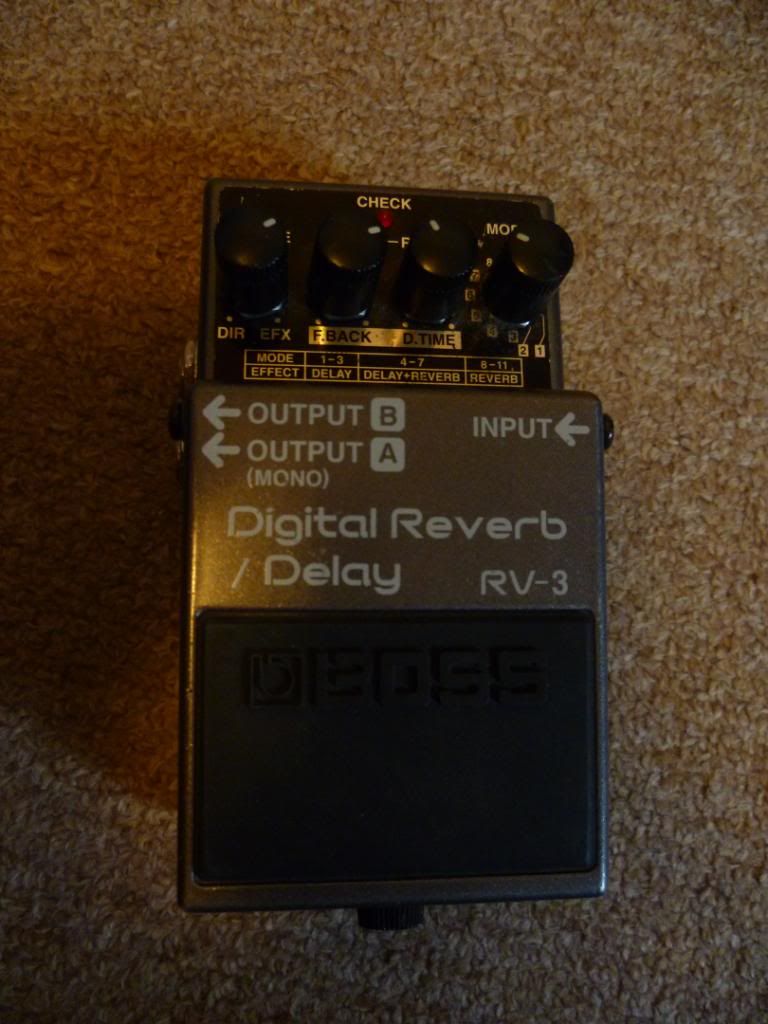
I think a better option is the RV line. Nowadays they just do standalone digital reverb which is a shame, as for a while they offered Reverb/Delay pedals. These are pretty cool. Ive got the RV-3. Its got 800ms delay, and numberous reveb patches (room, hall, plate etc) mixable and blendable with the delay over I think 11 presets.
Pretty epic sounding, great for 80s stuff, and great for ambient stuff.
Track one down if you can for cheap.
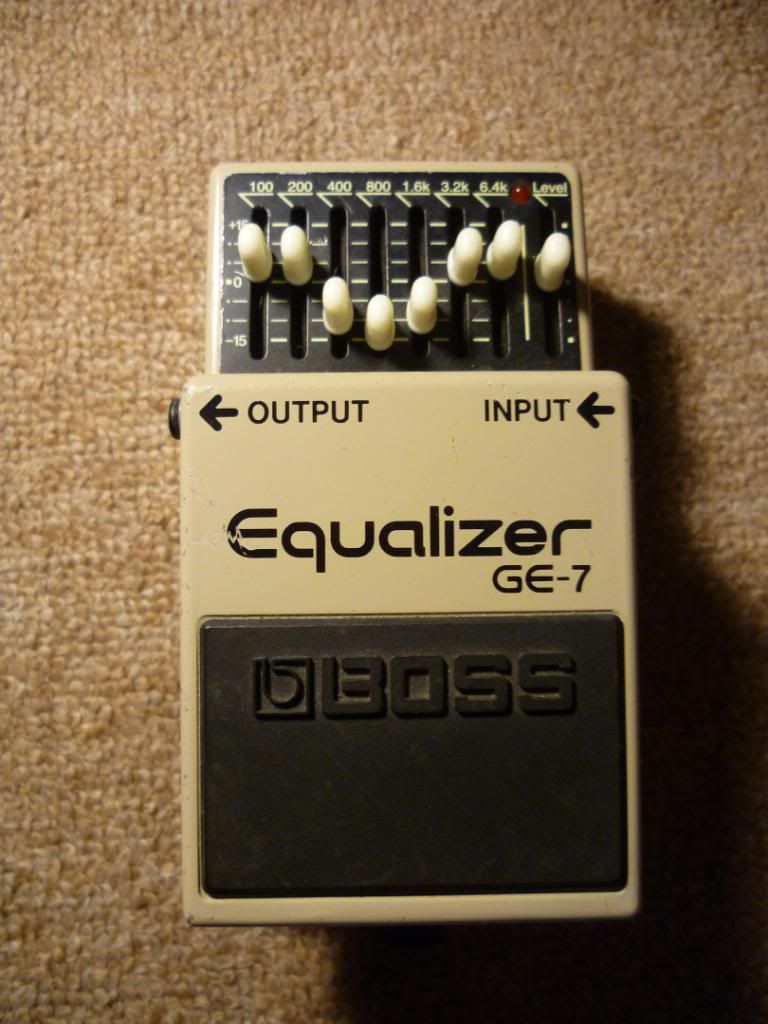
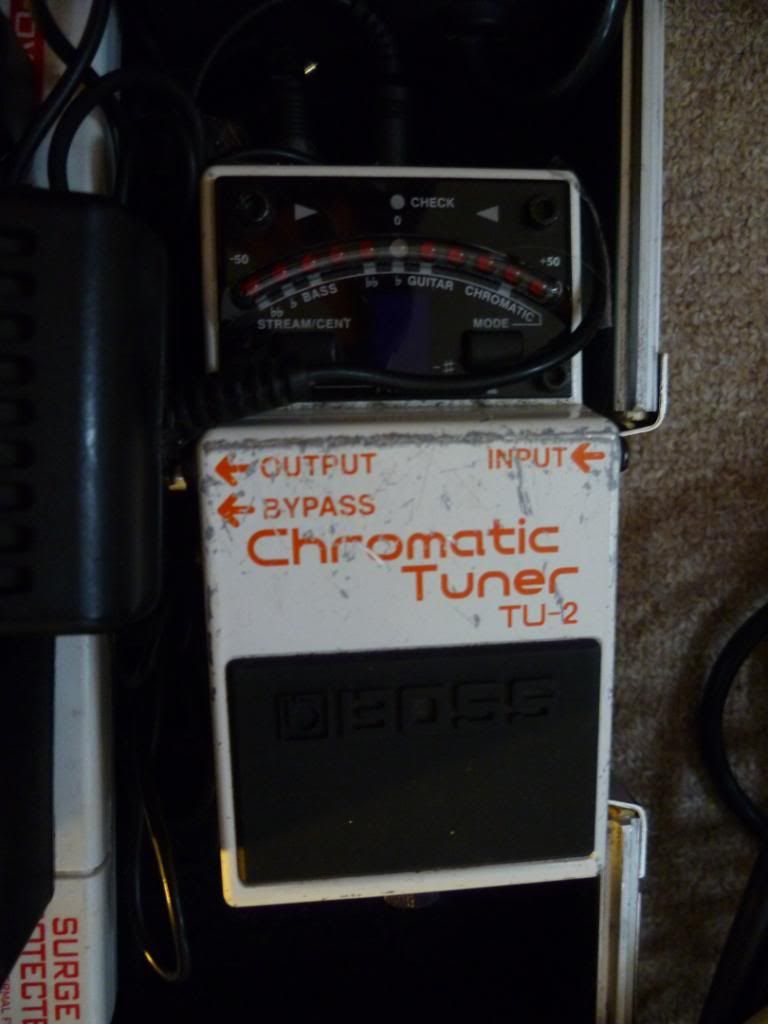
Then we get to the bog standard stuff again. I have an EQ and Tuner pedal from boss, because they are affordable, bullet proof and small footprint. Nowadays there are loads of cool tuners, peterson strobostomp, the TC polytune, korg pitchblack. At the time I got mine, the Boss was the only affordable, metal cased, widely available option. Its served me many many live shows, and has the scars to prove it. The EQ is great after any distortion or fuzz, or for tailoring a clean sound. Also, it can do a nice flat clean boost.
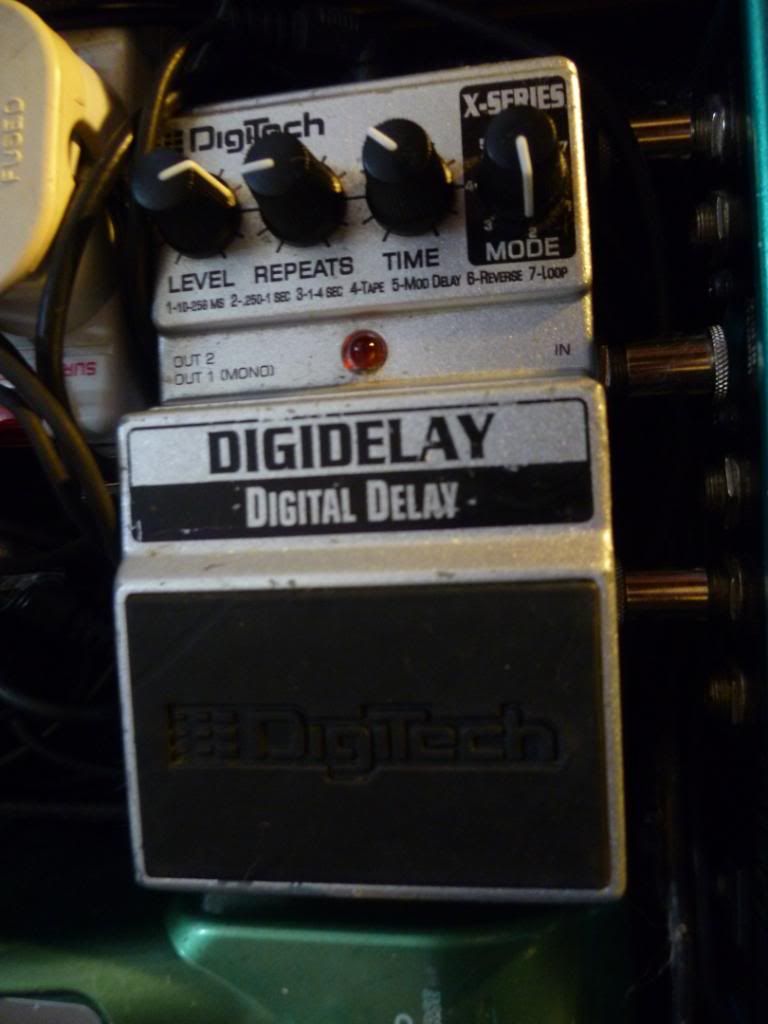
As this is called Boss (and Friends) I thought I would breifly list some friends. I have two Digitech Digidelays. This series of pedals is really nice. The delay has a broad range of settings, inc reverse, tape, modulated and a looper. They go for very cheap, and are a step up from the basic Boss DD-3. You can also get a great warbled chorus out of them on mod mode with minimum delay time and some feedback. I used to have two on my board, on for digital delay, the other for this cool chorus sound. However Ive recently invested in a standalone small analog chorus pedal which Ill save for another blog.
No effect collection would be complete without an MXR or two.
I used to have a reissue Phase 90, but I sold it. It would distort when used, and for that reason was pretty unusable. It was however a nice keepsake from a wicked guitar store in Vancouver, a beautiful city.
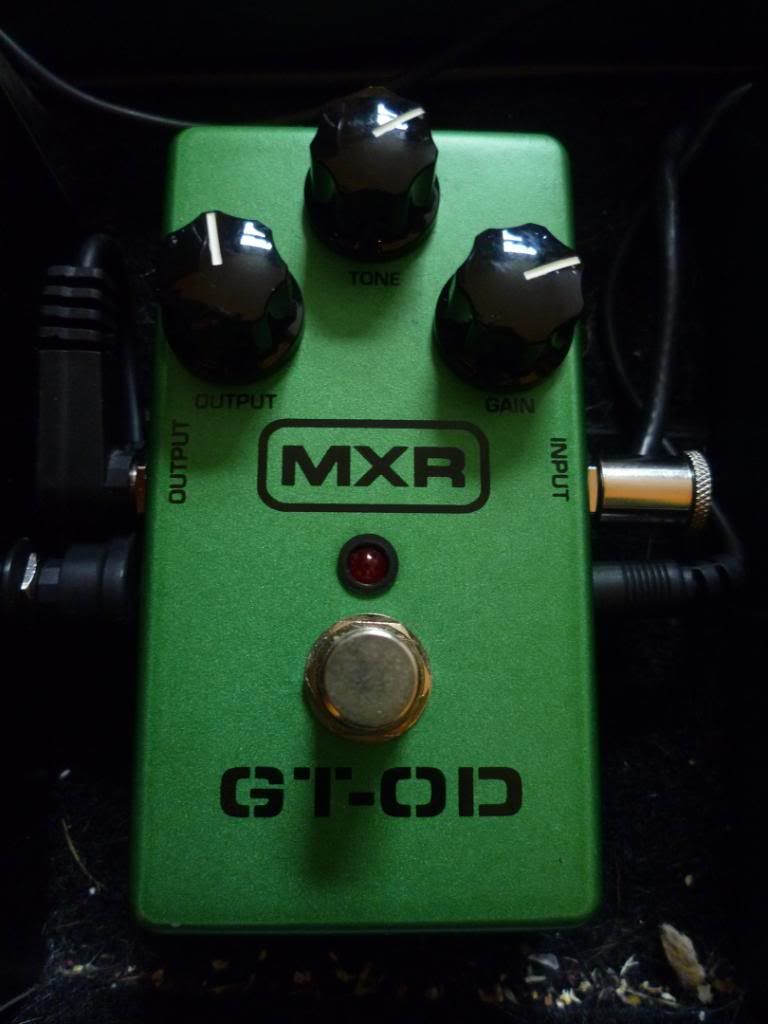
The other MXR pedal I have is a GT-OD. This is pretty much a tube screamer I think, but it has a nice bit of mid and bass. It replaced the aforementioned OS-2 on my board for now. Having said that I plan to build a Red Llama overdrive, so that might take its place in turn...who knows.
Im going to end by going full circle back to Boss again.
A few years hence, Boss introduced something called their "Twin Pedal" line. I dont know in detail, but it started out with a Overdrive/Dist box, a nice delay called DD-20 Gigadelay which my friend has, and a few others. Over time the line has grown to include loopers, a Roland Synth, a recreation of the famous tape echo Roland Space Echo, a few others, and THIS:
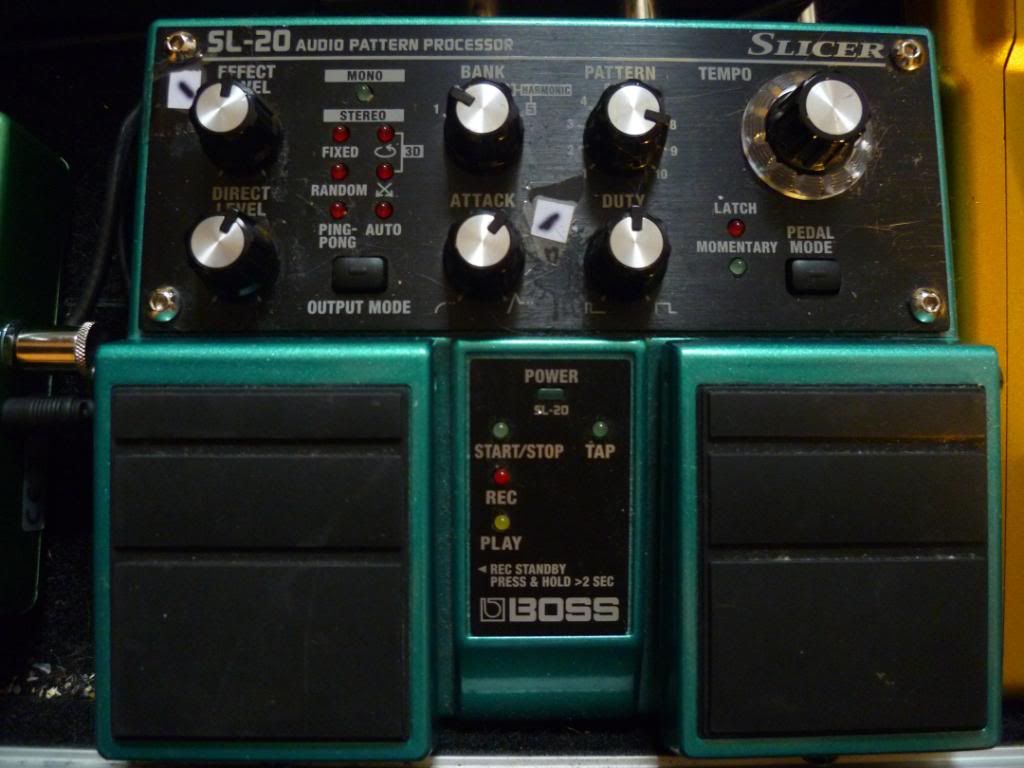
This turqoise tank, my fellow FX fans, is an SL-20 "Slicer". Its basically an auto panning tremolo/arpeggiator simulator. It has 5 banks of 10 presets, with some options on shaping the waveforms, and programmable panning. It also has its own built in looper. This is a serious peice of kit, and perfect for dance style music. It really is awesome. As soon as I heard of its existence, and relying solely on the really crap Boss marketing videos, I knew I had to have one. I have written lots of songs based around this effect. Its a great inspirational tool for rhythmic guitar playing. Combined with the Space Station synth pads its amazing. They run for £160 off, and I picked one up £85 second hand off some big music online website. Get in!
In my final installment, Im going to to catalogue the best of the rest, and open a dialog on Clone's, going back to some nice vintage examples from ROSS (sounds a bit like BOSS doesnt it ?!!)
Thanks for reading.
Having said that, however, I can almost guarantee even those most devout of purists own at least one boss pedal somewhere along the line, even if it is a hallowed DM delay or CE chorus from the golden 80s era (Made in Japan, with silver battery door knobs, and green labels...no wait, pink...no wait, black...aah I forget...)
I have a fairly broad history of BOSS effects pedals. Already seen in History lesson 1, I have a Boss SYB-3 Bass Synthesiser. This is brilliant for stupid triggered bleeps and filters. It works on bass and guitar equally well, as it has a sensitivity control. It also has nice usuable envelope filters, which sweep both up and down (think Mutron 3 if you dont know what an envelope filter is, or Auto Wah, for those less sophisitcated). Its a wah that gets more bright (or bassy) on how hard you pick. This box also expands on that by having envelope filter with square wave, which sounds awesome.
One of the ones that also got away (read, sold or traded) was a Boss Super Shifter. While in principal this is cool, in practice it wasnt. It wanted to be a Whammy PEdal, but it didnt have the wah pedal to control it. It wanted to be a harmoniser but it didnt track well. Basically a fail. I dont know why I bought it. Salesman peer pressure I think.
Heres an image for those who havent seen this one.
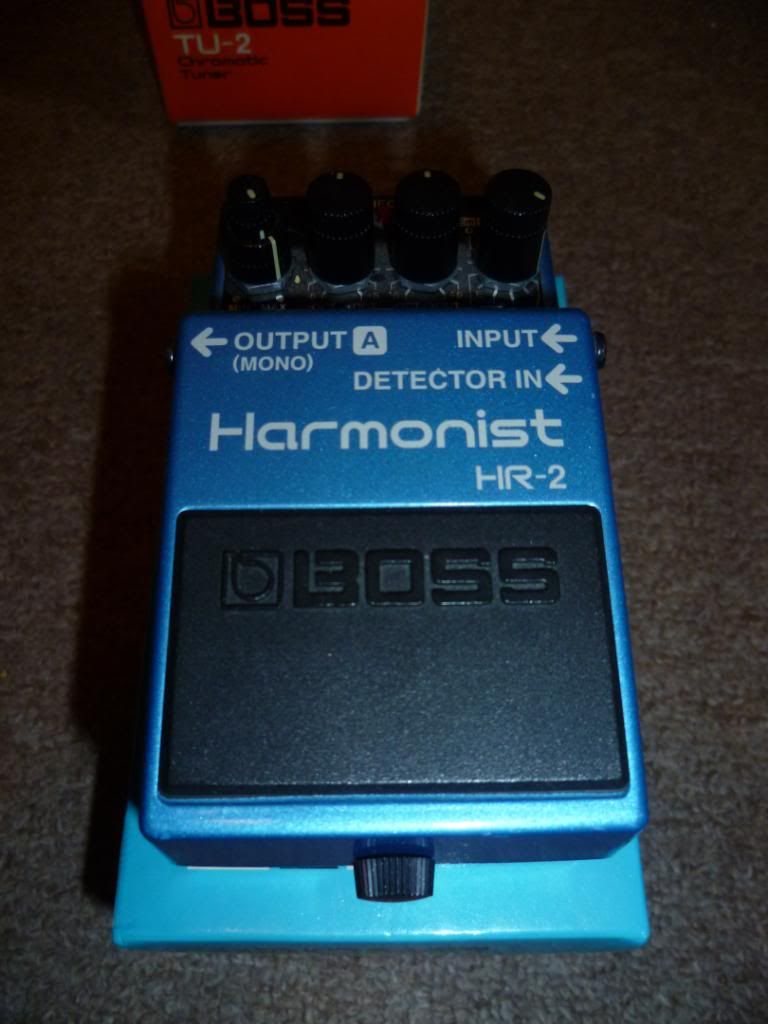
Speaking of harmonists, for some reason I have semi inherited this. Its my Dads. I dont really use it. Instant Brian May - assuming you can play in the allocated key selection ;)
Speaking of overdrives, a pedal I really do like and still use, which was an early purchase, was the OS-2 Overdrive/Distortion. This is a cool pedal. Its kinda like a SD-1 and a DS-1 in one box, with blendable voice control. At one end of the voice you have the overdrive, the other the harder distortion, and all colours in between. The you have the standard Output, Tone and Drive controls. I feel, an underrated beast indeed.
I mentioned the Boss DD line breifly earlier.
I think a better option is the RV line. Nowadays they just do standalone digital reverb which is a shame, as for a while they offered Reverb/Delay pedals. These are pretty cool. Ive got the RV-3. Its got 800ms delay, and numberous reveb patches (room, hall, plate etc) mixable and blendable with the delay over I think 11 presets.
Pretty epic sounding, great for 80s stuff, and great for ambient stuff.
Track one down if you can for cheap.
Then we get to the bog standard stuff again. I have an EQ and Tuner pedal from boss, because they are affordable, bullet proof and small footprint. Nowadays there are loads of cool tuners, peterson strobostomp, the TC polytune, korg pitchblack. At the time I got mine, the Boss was the only affordable, metal cased, widely available option. Its served me many many live shows, and has the scars to prove it. The EQ is great after any distortion or fuzz, or for tailoring a clean sound. Also, it can do a nice flat clean boost.
As this is called Boss (and Friends) I thought I would breifly list some friends. I have two Digitech Digidelays. This series of pedals is really nice. The delay has a broad range of settings, inc reverse, tape, modulated and a looper. They go for very cheap, and are a step up from the basic Boss DD-3. You can also get a great warbled chorus out of them on mod mode with minimum delay time and some feedback. I used to have two on my board, on for digital delay, the other for this cool chorus sound. However Ive recently invested in a standalone small analog chorus pedal which Ill save for another blog.
No effect collection would be complete without an MXR or two.
I used to have a reissue Phase 90, but I sold it. It would distort when used, and for that reason was pretty unusable. It was however a nice keepsake from a wicked guitar store in Vancouver, a beautiful city.
The other MXR pedal I have is a GT-OD. This is pretty much a tube screamer I think, but it has a nice bit of mid and bass. It replaced the aforementioned OS-2 on my board for now. Having said that I plan to build a Red Llama overdrive, so that might take its place in turn...who knows.
Im going to end by going full circle back to Boss again.
A few years hence, Boss introduced something called their "Twin Pedal" line. I dont know in detail, but it started out with a Overdrive/Dist box, a nice delay called DD-20 Gigadelay which my friend has, and a few others. Over time the line has grown to include loopers, a Roland Synth, a recreation of the famous tape echo Roland Space Echo, a few others, and THIS:
This turqoise tank, my fellow FX fans, is an SL-20 "Slicer". Its basically an auto panning tremolo/arpeggiator simulator. It has 5 banks of 10 presets, with some options on shaping the waveforms, and programmable panning. It also has its own built in looper. This is a serious peice of kit, and perfect for dance style music. It really is awesome. As soon as I heard of its existence, and relying solely on the really crap Boss marketing videos, I knew I had to have one. I have written lots of songs based around this effect. Its a great inspirational tool for rhythmic guitar playing. Combined with the Space Station synth pads its amazing. They run for £160 off, and I picked one up £85 second hand off some big music online website. Get in!
In my final installment, Im going to to catalogue the best of the rest, and open a dialog on Clone's, going back to some nice vintage examples from ROSS (sounds a bit like BOSS doesnt it ?!!)
Thanks for reading.
A history of my guitar effects purchases: Part two "The Big and Expensive ones".
Now, I cant say that I make a habit of buying ridiculously expensive pedals, but in the past I've been known to splooge some cash on some big, knob-laden beauties.
My first foray into a standalone pedal costing more than £100 was the Electo Harmonix PolyChorus. As a teen I got into Grunge, particularly Smashing Pumpkins, and a dollop of Nirvana. Around this time, EH was catching momentum and starting to reissue a number of NYC version effects. In a guitar magazine ad, I saw a stunning silver and aquamarine blue/green mini preview for a PolyChorus. Already I wanted it based simply on looks alone. Added to such tempting marketing spiel as "improved signal to noise ratio" I was sold before I even played one. I waited for months for them to finally ship, my stockist was SoundsGreatMusic.com in Heald Green, Cheshire.
A note on these guys -they used to be awesome for 2nd hand and good deals. As time has passed they are now very elitist / snobby high end hand crafted type dealers (in terms of FX, guitars, amps) and some staff can be a bit unhelpful. Still, I spent a fair whack of cash with them over the years. Here is my poly, its scuffed from lending it to a friend, and he also lost the wooden box :(

Next up is not really a pedal but its effectual none the less.
What with my Fuzz Factory build and now revealing this, Im sure you are all thinking, this guy is a closet Muse fan. Not the case. Anyway, I have a version 1 of these that died on me, so a couple months ago I splashed out on the current Version 3 Kaoss Pad. These are really fun and creative toys, and this one has a 4 track sampler included, and SD card support. We already used this a fair bit at band practice. these retail for £300 but I got mine used on eBay for £180. Happy with that.

Now, you cant really talk about BIG pedals without an honourable mention going to Lovetone.
I am quite a fan of Lovetone, albeit I've only owned 2 of their effects, and one clone. However the ones I've had (and still have) are literally some of the best effects ever. No, they dont deserve the massive massive super ginormous used prices they go for nowadays , but in their day they were unique, reasonably priced, hand made in the UK, and just generally awesome. Plus the added mojo that every cool band and producer known to man used them.
go to Lovetone, I think there is still a website there with info and clips.
Anyway, here is some history of my collection.
I started out wanting the ? aka The Flange With No Name. This beast is a all analog flanger tremolo pedal, with about 6 knobs and a bunch of footswtiches and numerous ins and outs. It also included a ligh sensitive jack for controlling the CV. These were list £349 less carriage (£10) from Lovetone direct. I actually had a couple of calls with Vlad Naslas over at Lovetone in advance of buying one. In the end I sourced one from the USA used for £237 I seem to recall. This was while I was at first year of University, and had no right spending 6 months of food rations on it. But I did. So there. Sadly I no longer have pics of my actual model, but you get the idea from this Google image:

Its the purple one bottom right. Im sad to say I sold it for £350 to pay some bills. I didnt use it so much, but as a collectors peice it was amazing, and for home and studio use. Id never use live due to value and size. You can get about double that for them these days, maybe more. I saw a Big Cheese (the orange fuzz box) go for over £600 on ebay. They typically go for at least £300. For a fuzz. That you can build for £30. Lol.
Edit - Whaddya know - Just checked eBay. Wow.
Lots of Money for a Lovetone?Flange
Anyway. Speaking of the Big cheese, I never owned a real one, but I owned a clone off eBay. I paid £80 ish for a Fromunda Cheese, in a nice hammertone gold finish. This was years before I started trying to solder my own stuff. Anyway, Ive searched and I cant find pics. It was cool. However I think there was an issue with it, as it never quite reached unity gain. I understand the OLC Chunky Cheese clones improve on the original and are even louder, so Im not sure how accurate the clone I had was. Anyway, I sold it for a profit and dont regret it. I might sometime make my own "Grand Cheddar".
My last Lovetone, and the one I keep to this day and will never sell, is my beloved v4 (the last one made, and best) DoppelGanger Dual LFO Phaser and Vibrato. This thing has every Phaser sound under the sun you could ever want, all gorgeous analog sound, massive box, lovely graphics, and loadsa knobs switches and kickers.
Basically image a really nice Phase 90 sound. Then times it by two. then make it so you can switch in the clean mix or not (so it sounds less or more pronounced ie phase vs vibrato). Then make it possible for one of the LFOs to sweep REALLY slowly. Then make it so that one of the LFOs can run in Square wave. The make the LFOs switchable waveforms. Then add switchable True bypass. You havent scratched the surface tet. If you ever get the chance to buy one for what you can afford I highly recommend it. Especially if you like phasers.
I wont bother to write up the whole Lovetone line, those interested can read much better written articles and reviews on he web. Suffice to say, if they werent now so rare and expensive, Id like to collect them all. I would especially like the RingStinger (germanium octave ring mod fuzz noise machine).
Here is my Dopp <3

And a size comparison to a Boss pedal.
LOL. You dont get good exchange rate in Lovetone:Pedal Board real estate.

I think the last one I will end this blog on is literally my number one best ever purchase out of nowhere that went on to become my most used, loved, revered, commented on and generally creative inspirational tool evvvaaaarrr. Ladies and Gentlemen. The massive yellow box of intergalactic gorgeousness:
DIGITECH SPACE STATION
 I wouldnt sell this even for £1000. Literally. Not worth it to me. This thing does every crazy sound under the sun. Pitch shifting, bell sounds, swells, ring modulators, harmonies. but its peice de resistance is its ambient synth pad sounds. It is just stunning. All those people looking for the shimmer sound by the Edge. This is better. Anyone heard of the Cocteau Twins? Add some more reverb, chorus/flange, and this is instant Robin Guthrie (who, I might add, is one of my fave guitarists). These are incredibly rare, command lots of money and generally dont change hands often.
I bought this at the NEC Birmingham at a music live event some years ago. Untested. New Old Stock. They didnt bring the adaptors to the event, and it needs its own special wall wart. So anyway, I just bought it. £120. Best £120 I ever spent. They were also closing out on the other XP series pedals such as the XP 100 whammy wah (red) the XP200 modulator (blue) and the grey XP 400 reverberator. All of these are cool effects.
Some cautionary stuff - this is 100% digital in no way true bypass at all. It has its own onboard preamp / trim control / input level thing that is always on. But what the heck. The sounds are amazing. I use it on everything.
So there is part two - big expensive stuff.
Ill be back with Part 3. It will be about those much loved BOSS pedals....
My first foray into a standalone pedal costing more than £100 was the Electo Harmonix PolyChorus. As a teen I got into Grunge, particularly Smashing Pumpkins, and a dollop of Nirvana. Around this time, EH was catching momentum and starting to reissue a number of NYC version effects. In a guitar magazine ad, I saw a stunning silver and aquamarine blue/green mini preview for a PolyChorus. Already I wanted it based simply on looks alone. Added to such tempting marketing spiel as "improved signal to noise ratio" I was sold before I even played one. I waited for months for them to finally ship, my stockist was SoundsGreatMusic.com in Heald Green, Cheshire.
A note on these guys -they used to be awesome for 2nd hand and good deals. As time has passed they are now very elitist / snobby high end hand crafted type dealers (in terms of FX, guitars, amps) and some staff can be a bit unhelpful. Still, I spent a fair whack of cash with them over the years. Here is my poly, its scuffed from lending it to a friend, and he also lost the wooden box :(

Next up is not really a pedal but its effectual none the less.
What with my Fuzz Factory build and now revealing this, Im sure you are all thinking, this guy is a closet Muse fan. Not the case. Anyway, I have a version 1 of these that died on me, so a couple months ago I splashed out on the current Version 3 Kaoss Pad. These are really fun and creative toys, and this one has a 4 track sampler included, and SD card support. We already used this a fair bit at band practice. these retail for £300 but I got mine used on eBay for £180. Happy with that.

Now, you cant really talk about BIG pedals without an honourable mention going to Lovetone.
I am quite a fan of Lovetone, albeit I've only owned 2 of their effects, and one clone. However the ones I've had (and still have) are literally some of the best effects ever. No, they dont deserve the massive massive super ginormous used prices they go for nowadays , but in their day they were unique, reasonably priced, hand made in the UK, and just generally awesome. Plus the added mojo that every cool band and producer known to man used them.
go to Lovetone, I think there is still a website there with info and clips.
Anyway, here is some history of my collection.
I started out wanting the ? aka The Flange With No Name. This beast is a all analog flanger tremolo pedal, with about 6 knobs and a bunch of footswtiches and numerous ins and outs. It also included a ligh sensitive jack for controlling the CV. These were list £349 less carriage (£10) from Lovetone direct. I actually had a couple of calls with Vlad Naslas over at Lovetone in advance of buying one. In the end I sourced one from the USA used for £237 I seem to recall. This was while I was at first year of University, and had no right spending 6 months of food rations on it. But I did. So there. Sadly I no longer have pics of my actual model, but you get the idea from this Google image:
Its the purple one bottom right. Im sad to say I sold it for £350 to pay some bills. I didnt use it so much, but as a collectors peice it was amazing, and for home and studio use. Id never use live due to value and size. You can get about double that for them these days, maybe more. I saw a Big Cheese (the orange fuzz box) go for over £600 on ebay. They typically go for at least £300. For a fuzz. That you can build for £30. Lol.
Edit - Whaddya know - Just checked eBay. Wow.
Lots of Money for a Lovetone?Flange
Anyway. Speaking of the Big cheese, I never owned a real one, but I owned a clone off eBay. I paid £80 ish for a Fromunda Cheese, in a nice hammertone gold finish. This was years before I started trying to solder my own stuff. Anyway, Ive searched and I cant find pics. It was cool. However I think there was an issue with it, as it never quite reached unity gain. I understand the OLC Chunky Cheese clones improve on the original and are even louder, so Im not sure how accurate the clone I had was. Anyway, I sold it for a profit and dont regret it. I might sometime make my own "Grand Cheddar".
My last Lovetone, and the one I keep to this day and will never sell, is my beloved v4 (the last one made, and best) DoppelGanger Dual LFO Phaser and Vibrato. This thing has every Phaser sound under the sun you could ever want, all gorgeous analog sound, massive box, lovely graphics, and loadsa knobs switches and kickers.
Basically image a really nice Phase 90 sound. Then times it by two. then make it so you can switch in the clean mix or not (so it sounds less or more pronounced ie phase vs vibrato). Then make it possible for one of the LFOs to sweep REALLY slowly. Then make it so that one of the LFOs can run in Square wave. The make the LFOs switchable waveforms. Then add switchable True bypass. You havent scratched the surface tet. If you ever get the chance to buy one for what you can afford I highly recommend it. Especially if you like phasers.
I wont bother to write up the whole Lovetone line, those interested can read much better written articles and reviews on he web. Suffice to say, if they werent now so rare and expensive, Id like to collect them all. I would especially like the RingStinger (germanium octave ring mod fuzz noise machine).
Here is my Dopp <3

And a size comparison to a Boss pedal.
LOL. You dont get good exchange rate in Lovetone:Pedal Board real estate.

I think the last one I will end this blog on is literally my number one best ever purchase out of nowhere that went on to become my most used, loved, revered, commented on and generally creative inspirational tool evvvaaaarrr. Ladies and Gentlemen. The massive yellow box of intergalactic gorgeousness:
DIGITECH SPACE STATION

I bought this at the NEC Birmingham at a music live event some years ago. Untested. New Old Stock. They didnt bring the adaptors to the event, and it needs its own special wall wart. So anyway, I just bought it. £120. Best £120 I ever spent. They were also closing out on the other XP series pedals such as the XP 100 whammy wah (red) the XP200 modulator (blue) and the grey XP 400 reverberator. All of these are cool effects.
Some cautionary stuff - this is 100% digital in no way true bypass at all. It has its own onboard preamp / trim control / input level thing that is always on. But what the heck. The sounds are amazing. I use it on everything.
So there is part two - big expensive stuff.
Ill be back with Part 3. It will be about those much loved BOSS pedals....
Subscribe to:
Comments (Atom)